Download sc1
Author: g | 2025-04-23

SC1, SC1-INT, SC1-INTB, SC1-INTD, SC1-64M (T03, T03M) SC1; SC1-INT; SC1-INTB; SC1-INTD; SC1-64M; All Drivers. All Drivers. Windows 10 - 32 Bit / SC1. Click Here to Download. All Drivers. Windows 8.1 - 32 Bit / SC1-INT. Click Here to Download. All Drivers. Windows 10 - 32 Bit / SC1-INT. Click Here to Download. All Drivers. Windows 10 - 32

SC1, SC1-INT, SC1-INTB, SC1-INTD, SC1-64M (T03, T03M)
Manuals Brands Contixo Manuals Toy SC1 User manual Contents Table of Contents Bookmarks Speed Crawler SC1User Manual*product colors may varyPLEASE READ THIS MANUAL BEFORE USING.PLEASE RETAIN THIS INFORMATION FOR FUTURE REFERENCE Need help? Do you have a question about the SC1 and is the answer not in the manual? Questions and answers Related Manuals for Contixo SC1 Summary of Contents for Contixo SC1 Page 1 Speed Crawler SC1 User Manual *product colors may vary PLEASE READ THIS MANUAL BEFORE USING. PLEASE RETAIN THIS INFORMATION FOR FUTURE REFERENCE... Page 2 Powering it On How to turn on the SC1 Press here Hold down the Power button for 2 seconds to turn on the SC1 Speed Crawler... Page 3: How To Use SC1 Wrist Remote How to use Put it on Boot Put your thumb Long Press Power through the rubber Button to turn on. loop and strap it 3 LED’s blinking 3 times fast around your palm. indicate the remote is booted... Page 4 SC1 Remote Control How to use Speaker Programming Mode Short Press Music Mode Long Press For 3 seconds Spray Move Move Forward/Back Left/Right Toggle Stealth/Truck Mode Vol- Vol+ Automatic Demo Left Forward Right Forward Forward & Forward & Left Right... Page 5: Battery Installation Battery Installation SC1 Battery Installation Use a small phillips head screwdriver to remove the battery cover. Replace the battery cover and screw back into place. *When removing the battery to charge, take care to unclasp the connector before pulling it off. Page 6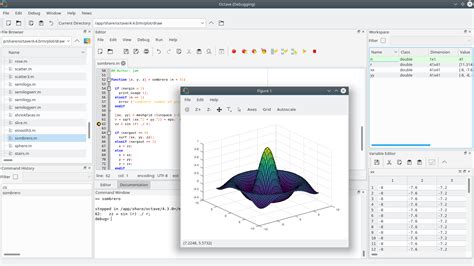
Download Data File: SC1 Data Download SC1 Data A key activity
SugarSync support may sometimes ask to send your SugarSync log file for troubleshooting purposes when submitting a support ticket.The file name to look for is sc1.log. If you see only sc1, send that one. If there are more, and you know how to zip files, then send them all.Attaching it to your ticketLogs files are text files, and you can dramatically reduce the size by zipping it. Please zip the log file(s) and attach it to the corresponding ticket.Where to find the filesBelow is how to find the sc1.log file on Windows or macOS.Windows1. Open File Explorer in Windows.2. Paste this into the address bar and press ENTER: %localappdata%\SugarSync3. Look for the file called sc1.log (or sc1), right-click on it and select Copy.4. Paste the file somewhere you'll remember it, and attach it to your reply to the support ticket.macOS1. Open the Finder and from the menu bar at the top select Go > Go To Folder...2. Paste this in: ~/Library/Application Support/SugarSync3. Click on Go.4. Look for the file called sc1.log (or sc1), right click on it and select Copy.5. Paste the file somewhere you'll remember it, and attach it to your reply to the support ticket.Download SmartConsole - sc1.checkpoint.com
Principe | Progen | RUNE | Schyster | Shitzu | Speedophile | Stanley | Steel Horse | Toundra | Truffade | Vapid | Vom Feuer | Vulcar | Weeny | Western Company | Western Motorcycle Company | Willard | Zirconium | Överflöd | Übermacht | Vehicles with no manufacturer in the HD UniverseRelatedVehicles | Garages | Spray Shop (Pay 'n' Spray | Los Santos Customs) | Driving School | Driving | Carjacking | Bail Out | Drive-By Shooting | TowingRelated (categories)Vehicles | Vehicle businesses | Vehicle dealerships | Vehicle classes | Vehicle mechanics | Armed vehicles[ v • e ]Vehicles in Grand Theft Auto OnlineSuper811 | Adder | Autarch | Banshee 900R | Bullet | Champion | Cheetah | Cyclone (II) | Deveste Eight | Emerus | Entity XF (MT | XXR) | ETR1 | FMJ | Furia | GP1 | Ignus (Weaponized) | Infernus | Itali GTB (Custom) | Krieger | LM87 | Nero (Custom) | Osiris | Penetrator | Pipistrello | RE-7B | Reaper | S80RR | SC1 | Scramjet | Sultan RS | T20 | Taipan | Tigon | Tempesta | Tezeract | Thrax | Torero XO | Turismo Omaggio | Turismo R | Tyrant | Tyrus | Vacca | Vagner | Vigilante | Virtue | Visione | Voltic (Rocket) | X80 Proto | XA-21 | Zeno | Zentorno | ZorrussoSports300R | 8F Drafter | 9F (Cabrio | 10F (Widebody)) | Alpha | Banshee (GTS) | Bestia GTS | Blista Compact (Go Go Monkey) | Buffalo (S. SC1, SC1-INT, SC1-INTB, SC1-INTD, SC1-64M (T03, T03M) SC1; SC1-INT; SC1-INTB; SC1-INTD; SC1-64M; All Drivers. All Drivers. Windows 10 - 32 Bit / SC1. Click Here to Download. All Drivers. Windows 8.1 - 32 Bit / SC1-INT. Click Here to Download. All Drivers. Windows 10 - 32 Bit / SC1-INT. Click Here to Download. All Drivers. Windows 10 - 32Sc1 ringtone by Fairlightash - Download on ZEDGE
BARCODE SCANNER MODULEINSTRUCTIONBEDIENUNGSANLEITUNGBefore using, read this manual carefully toBitte lesen Sie diese Bedienungsanleitung vorensure correct use.Gebrauch aufmerksam durch, um eine korrekteBedienung zu gewährleisten.MODE D'EMPLOIISTRUZIONIPour une utilisation correcte, lire attentivement cemode d'emploi.Prima dell'uso, leggere con attenzione questomanuale per poter usare l'unità in maniera corretta.INSTRUCCIONESИНСТРУКЦИЯPara obtener un óptimo rendimiento, leaatentamente este manual antes del uso.Перед использованием тщательно прочтитеруководство, чтобы гарантировать правильную работу.EnglishSC1 Operating ConditionsApplicable Product: DS-5000/DS-5000iD with firmware version 1.04 or later.Applicable software: DSS Player Pro R5 version 5.0.1.0 or higher.Please contact your Olympus dealer if you need any help with checking/updating firmwareand/or software.How to attach and remove the barcode scanner moduleAttaching ( illustration 1)1Remove the SD card from the DS-5000/DS-5000iD SD card slot.2Insert SC1 into the SD card slot.Insert it far enough so that the clasp fastens securely.Removing (illustration 2)1Hold down the release buttons on the sides of the SC1 and pull it out of the SDcard slot.Notes• Make sure that the SC1 is facing the correct direction and insert it in a straight manner.• Never insert or remove the SC1 while the DS-5000/DS-5000iD is ON.• Do not touch the terminal directly with your hand.• Do not apply excessive force when attaching or removing the SC1.How to use the barcode scanner moduleAfter attaching the SC1 to the DS-5000/DS-5000iD, you will be able to input the optionitem value on new files or pre-recorded files by scanning the barcodes.Refer to "Setting the Author ID and Work Type" in the DS-5000/DS-5000iD instructions formore information on option item value.Using the DSS Player software, work type option items input method can be set with thefollowing modes.Individual scanning: Scan each option item individuallyBatch scanning: Scan multiple option items that you have preselected in a single action.You can also set the range of digits in the barcode data for each option item.How to input option item value (SCHUBERTH SC1 MANUAL Pdf Download
On the beach in the summer.• Do not use organic solvents such as alcohol and lacquer thinner to clean the unit.• Avoid strong vibrations or shocks.• Do not disassemble, repair or modify the unit yourself.• Keep the unit out of the reach of children.User manual laser safety informationThis product complies with 21CFR 1040.10 and 1040.11 except for deviations pursuantto Laser Notice 50, dated June 24, 2007. It also complies with IEC608251:1993+A1:1997+A2:2001 and EN 60825-1:1994+A1:2002+A2:2001.1ClaspFermoirSC1CierreVerschlussGancioЗажимLabel attach positionPosition de l'étiquettePosición de sujeción de la etiquetaPosition für den AufkleberPosizione attacco etichettaМесто для этикеткиэтоFrançaisConditions de fonctionnement du SC1Produit applicable : DS-5000/DS-5000iD avec version micrologicielle 1.04 ou ultérieure.Logiciel applicable : DSS Player Pro R5 version 5.0.1.0 ou supérieure.Veuillez contacter votre revendeur Olympus si vous avez besoin d'aide pour la vérification/mise à jour du micrologiciel et/ou du logiciel.Comment fixer et retirer le module de scanner de code-barresFixation ( illustration 1)1Retirez la carte SD de la fente pour carte SD du DS-5000/DS-5000iD.2Insérez le SC1 dans la fente pour carte SD.Insérez-le assez loin pour que le fermoir s'enclenche fermement.Retrait (illustration 2)1Maintenez les boutons de dégagement enfoncés sur les côtés du SC1 et sortez-lede la fente pour carte SD.Remarques• Assurez-vous que le SC1 se trouve dans le bon sens et insérez-le tout droit.• N'insérez et ne retirez jamais le SC1 lorsque le DS-5000/DS-5000iD est sous tension.• Ne touchez pas la borne directement avec les doigts.• N'appliquez pas de force excessive lors de la fixation ou du retrait du SC1.Comment utiliser le module de scanner de code-barresAprès avoir fixé le SC1 au DS-5000/DS-5000iD, vous pourrez saisir la valeur d'élémentoptionnel des nouveaux fichiers ou des fichiers préenregistrés en balayant les codes-barres.Veuillez consulter la section «Réglage de l'ID auteur et du type de travail» du mode d'emploidu DS-5000/DS-5000iD pour de plus amples informations sur la valeur d'élément optionnel.Avec le logiciel DSS Player,Download Train-Tech SC1 Manual
SKU # 78920 SC1 Regular price $13.99 USD Regular price Sale price $13.99 USD Unit price per Sale Currently Unavailable The original and unrivaled “New Bike in a Can”, SC1 truly restores that factory shine and lives up to the claim. SC1 high gloss coating is specifically formulated to protect and beautify multiple surfaces including plastic, vinyl, rubber and carbon fiber. Water-resistant formulation is safe for use on gloss or matte finishes and makes the clean-up process easier by forming a durable coating that repels mud, dirt and debris. Can be applied and left untouched or allowed to setup and be buffed to a dry sheen, leaving a long-lasting lusterSafety Data Technical Data Applications For use on multiple finishes. For a non-greasy, brilliant sheen, spray on surface, let setup and then wipe off excess. To create an outstanding barrier against mud and other debris from sticking, spray on surface and leave wet. For best performance, first clean and prepare area with Maxima Bio Wash or similar wash. Features • The original and unparalleled “New Bike in a Can”.• Returns surfaces to factory shine and color.• Wicks away mud, dirt and other finish-dulling debris.• Surface-tenacious formulation stays in place in all conditions.• Fresh scent pleasant for use indoors. View full details OTHER GREAT AEROSOL PRODUCTS SUSPENSION CLEAN Regular price From $10.99 USD Regular price Sale price From $10.99 USD Unit price per MPPL Regular price $10.99 USD Regular price Sale price $10.99 USD Unit price per SPEED WAX Regular price $12.99 USD Regular price Sale price $12.99 USD Unit price perDownload Vengeance sc1 mp4 - fastfile.cc
Que el cierre lo sujete de forma segura.Desacoplamiento ( ilustración 2)1Presione los botones de liberación situados en los laterales del SC1 y extráigalode la ranura de la tarjeta SD.Notas• Asegúrese de que el SC1 esté orientado en la dirección correcta e insértelo sin inclinarlo.• Nunca inserte o extraiga el SC1 mientras la DS-5000/DS-5000iD esté en ON.• No toque el terminal directamente con la mano.• No aplique demasiada fuerza cuando acople o extraiga el SC1.Cómo utilizar el módulo de escaneo de códigos de barraTras acoplar el SC1 a la DS-5000/DS-5000iD, podrá introducir el valor de la opción dearchivos nuevos o pregrabados mediante el escaneado de los códigos de barras.Consulte "Configuración de identificación de autor y tipo de trabajo" en las instruccionesde la DS-5000/DS-5000iD para más información sobre el valor de la opción.Mediante el software DSS Player, el método de introducción del valor de la opción para eltipo de trabajo puede ajustarse con los siguientes modos.Escaneo individual: Escanee cada elemento opcional de forma individual.Escaneo de lotes: Escanee múltiples opciones ya preseleccionadas en una única acción.También puede ajustar el rango de dígitos en los datos del código de barras para cadaelemento opcional.Cómo introducir el valor de la opción ( ilustración 3)1Visualice la pantalla de introducción de la información de archivos mediante losajustes del tipo de trabajo.Consulte "Configuración de identificación de autor y tipo de trabajo" en las instrucciones de la DS-5000 y DS-5000iD para más información sobre los ajustes del tipo de trabajo y la pantalla deintroducción de información de archivos.+2Seleccione la opción que desee introducir medianteo3Pulse el botón F1(SCAN) para escanear el código de barras.Los datos del código de barras escaneado aparecerán en el LCD.El máximo número de caracteres que se puede introducir para un elemento opcional es 20 y deéstos, sólo 16 aparecerán la pantalla LCD.Si quiere continuar introduciendo elementos opcionales. SC1, SC1-INT, SC1-INTB, SC1-INTD, SC1-64M (T03, T03M) SC1; SC1-INT; SC1-INTB; SC1-INTD; SC1-64M; All Drivers. All Drivers. Windows 10 - 32 Bit / SC1. Click Here to Download. All Drivers. Windows 8.1 - 32 Bit / SC1-INT. Click Here to Download. All Drivers. Windows 10 - 32 Bit / SC1-INT. Click Here to Download. All Drivers. Windows 10 - 32 SC1, SC1-INT, SC1-INTB, SC1-INTD, SC1-64M (T03, T03M) All Drivers. Windows 8.1 - 32 Bit / SC1. Click Here to Download. All Drivers. Windows 10 - 32 Bit / SC1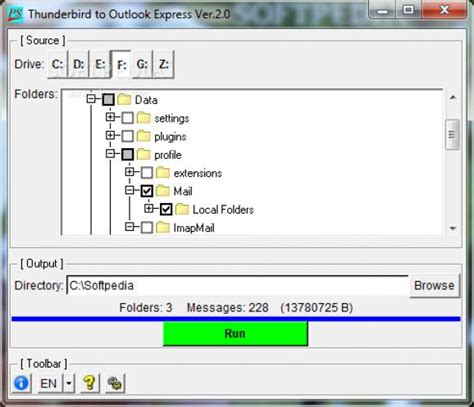
Download Spent sc1 mp4 - fastfile.cc
1022English Composition II: GT-CO23 ART 1112Art History Renaissance to 1900: GT-AH13 ART 10033-D Design3 ART 1202 or ART 1203 Drawing II (ART 1202) or Figure Drawing (ART 1203)3 GT- AHLIT 1015, HUM 1021/1022, PHI 1011/1012/1013, or Any GT-AH3 Total Credit Hours:15 Third Semester GT- MA1Math for Liberal Arts (MAT 1240) or Any GT-MA13 GT- SC1Any Science (GT-SC1) Course4 GT- SSGEO 1005, ANT 1001, or Any GT-SS3 REQUIRED Any Studio Art Course3 ELECTIVE Any Approved Elective List Course3 Total Credit Hours:16 Fourth Semester GT- SC1/2Any Science (GT-SC1/2) Course3 GT- HI1HIS 1310/1320 or Any GT-HI13 GT- SSGEO 1005, ANT 1001, or Any GT-SS3 ELECTIVE Any Approved Elective List Course3 ELECTIVE Any Approved Elective List Course2 Total Credit Hours:14 Total Credit Hours: 60Important Program Notes:Per the Statewide Transfer Articulation Agreement (STAA), if ART 1002, ART 1111, ART 1112, ART 1113, and/or ART 1201 are not required for the major at a receiving 4-year institution, they will be applied to the Bachelor's degree as elective credit toward graduation. Please check with the receiving institution to determine in which these courses will be applied.Per the Statewide Transfer Articulation Agreement (STAA), you must take two gtPathways Natural & Physical Science courses (GTSC1, GT-SC2). One of these courses must have the required laboratory (GT-SC1).If you take Math for Liberal Arts (MAT 1240) and/or more credits in science than are listed, it will reduce the 8 credits of electives needed. You must complete a minimum of 60 credits to complete this degree. If receiving financial aid, you should only take courses and credits as required for this degree. Check with your advisor to monitor your completion progress.Download SC1 Enslavers and DarkVengeance Remake
Game Structure CosPlay game is nothing more than a standard Scala3-based program. In fact, CosPlay imposes absolutely minimum requirements on overall ceremony and code organization. There are only a couple of methods that need to be called to initialize the game engine, start the game loop and dispose the game engine when the game exists. Note that built-in examples provide great illustration on game organization. CosPlay provided two sets of methods to manage the game's lifecycle:First set uses classic exception-based handling.Another set uses Try-monad for composable effect-based error handling. While you can choose either way the effect-based error handling forces a more rigorous error handling requiring to handle errors at each call. Note that you can't mix these two approaches. Below are two examples of these two approaches to error handing for game's lifecycle management: import org.cosplay.* object Game: def main(args: Array[String]): Unit = // Initialize the engine. CPEngine.init( CPGameInfo(name = "My Game"), System.console() == null || args.contains("emuterm") ) // Create game scenes & their scene objects. val sc1 = new CPScene(...) val sc2 = new CPScene(...) // Start the game & wait for exit. try CPEngine.startGame(sc1, sc2) finally CPEngine.dispose() sys.exit(0) NOTES: Although not a requirement, it is recommended to use main(...) method (line 4) as an entry point to the game application. It provides compatibility with the standard Java runtime. Before you can use CosPlay game engine you need to initialize it by calling CPEngine.init(...) method (line 6). See CPEngine object for API details. Note the line 8: System.console() == null || args.contains("emuterm"). This is an idiomatic way to check whether the game is running in a native ANSI terminal or in the built-in terminal emulator. This allows user to pass emuterm command line parameter to force the built-in terminal emulator if for some reason the native ANSI terminal is detected but does not work properly. After the game engine is initialized but before you start the game you need to create your initial scenes, scene objects, assets or anything else (lines 12-13) your game may need to start. Note that you can add new and remove existing scenes, scene object, assets, etc. at any point of the game later on. In fact, game can choose different strategies of either pre-creating all necessary resources upfront or create them as needed on the fly - but at least one initial scene must be created before the game can start. Once at least one scene is ready - you can start the game by calling CPEngine.startGame(...) method (line 16). As always, see CPEngine object for API details. It is a good practice to wrap this call into try-finally clause and call CPEngine.dispose() in the finally clause (line 17). import org.cosplay.* object. SC1, SC1-INT, SC1-INTB, SC1-INTD, SC1-64M (T03, T03M) SC1; SC1-INT; SC1-INTB; SC1-INTD; SC1-64M; All Drivers. All Drivers. Windows 10 - 32 Bit / SC1. Click Here to Download. All Drivers. Windows 8.1 - 32 Bit / SC1-INT. Click Here to Download. All Drivers. Windows 10 - 32 Bit / SC1-INT. Click Here to Download. All Drivers. Windows 10 - 32 SC1, SC1-INT, SC1-INTB, SC1-INTD, SC1-64M (T03, T03M) All Drivers. Windows 8.1 - 32 Bit / SC1. Click Here to Download. All Drivers. Windows 10 - 32 Bit / SC1Download StellarCraft [FORGE] - SC1 - CurseForge
Game: def main(args: Array[String]): Unit = // Initialize the engine. CPEngine.initEff( CPGameInfo(name = "My Game"), System.console() == null || args.contains("emuterm") ).recover(_ => sys.exit(1)) // Create game scenes & their scene objects. val sc1 = new CPScene(...) val sc2 = new CPScene(...) // Start the game & wait for exit. CPEngine.startGameEff(sc1, sc2).recover(_ => sys.exit(2)) // Dispose the engine. CPEngine.disposeEff().fold(_ => sys.exit(3), _ => sys.exit(0)) NOTES: Notice that effect-based error handling forces us to handle error at each step supplying specific error handling (in this example exiting process with appropriate exit code). Although not a requirement, it is recommended to use main(...) method (line 4) as an entry point to the game application. It provides compatibility with the standard Java runtime. Before you can use CosPlay game engine you need to initialize it by calling CPEngine.initEff(...) method (line 6). See CPEngine object for API details. Note the line 8: System.console() == null || args.contains("emuterm"). This is an idiomatic way to check whether the game is running in a native ANSI terminal or in the built-in terminal emulator. This allows user to pass emuterm command line parameter to force the built-in terminal emulator if for some reason the native ANSI terminal is detected but does not work properly. After the game engine is initialized but before you start the game you need to create your initial scenes, scene objects, assets or anything else (lines 12-13) your game may need to start. Note that you can add new and remove existing scenes, scene object, assets, etc. at any point of the game later on. In fact, game can choose different strategies of either pre-creating all necessary resources upfront or create them as needed on the fly - but at least one initial scene must be created before the game can start. Once at least one scene is ready - you can start the game by calling CPEngine.startGameEff(...) method (line 16). As always, see CPEngine object for API details. Upon exit from the game loop we call CPEngine.disposeEff(). That's it! 👌In-Game Shortcuts While in game you can use the following reserved keyboard shortcuts. Note that these keys are NOT available to the game itself as they are intercepted and processed by the game engine itself:Ctrl+Q - to toggle in-game FPS overlay.Ctrl+L - to open GUI-based log viewer & debugger.F12 - to take the screenshot in REXPaint *.xp format saved in the current folder. As we have seen in the game organization section above the CosPlay game engine is defined by CPEngine object. Game engine is mostly an internal object, and it is only used at the beginning of the game. It provides variety of utility and miscellaneous methods for the games (see scaladoc for APIComments
Manuals Brands Contixo Manuals Toy SC1 User manual Contents Table of Contents Bookmarks Speed Crawler SC1User Manual*product colors may varyPLEASE READ THIS MANUAL BEFORE USING.PLEASE RETAIN THIS INFORMATION FOR FUTURE REFERENCE Need help? Do you have a question about the SC1 and is the answer not in the manual? Questions and answers Related Manuals for Contixo SC1 Summary of Contents for Contixo SC1 Page 1 Speed Crawler SC1 User Manual *product colors may vary PLEASE READ THIS MANUAL BEFORE USING. PLEASE RETAIN THIS INFORMATION FOR FUTURE REFERENCE... Page 2 Powering it On How to turn on the SC1 Press here Hold down the Power button for 2 seconds to turn on the SC1 Speed Crawler... Page 3: How To Use SC1 Wrist Remote How to use Put it on Boot Put your thumb Long Press Power through the rubber Button to turn on. loop and strap it 3 LED’s blinking 3 times fast around your palm. indicate the remote is booted... Page 4 SC1 Remote Control How to use Speaker Programming Mode Short Press Music Mode Long Press For 3 seconds Spray Move Move Forward/Back Left/Right Toggle Stealth/Truck Mode Vol- Vol+ Automatic Demo Left Forward Right Forward Forward & Forward & Left Right... Page 5: Battery Installation Battery Installation SC1 Battery Installation Use a small phillips head screwdriver to remove the battery cover. Replace the battery cover and screw back into place. *When removing the battery to charge, take care to unclasp the connector before pulling it off. Page 6
2025-04-09SugarSync support may sometimes ask to send your SugarSync log file for troubleshooting purposes when submitting a support ticket.The file name to look for is sc1.log. If you see only sc1, send that one. If there are more, and you know how to zip files, then send them all.Attaching it to your ticketLogs files are text files, and you can dramatically reduce the size by zipping it. Please zip the log file(s) and attach it to the corresponding ticket.Where to find the filesBelow is how to find the sc1.log file on Windows or macOS.Windows1. Open File Explorer in Windows.2. Paste this into the address bar and press ENTER: %localappdata%\SugarSync3. Look for the file called sc1.log (or sc1), right-click on it and select Copy.4. Paste the file somewhere you'll remember it, and attach it to your reply to the support ticket.macOS1. Open the Finder and from the menu bar at the top select Go > Go To Folder...2. Paste this in: ~/Library/Application Support/SugarSync3. Click on Go.4. Look for the file called sc1.log (or sc1), right click on it and select Copy.5. Paste the file somewhere you'll remember it, and attach it to your reply to the support ticket.
2025-04-01BARCODE SCANNER MODULEINSTRUCTIONBEDIENUNGSANLEITUNGBefore using, read this manual carefully toBitte lesen Sie diese Bedienungsanleitung vorensure correct use.Gebrauch aufmerksam durch, um eine korrekteBedienung zu gewährleisten.MODE D'EMPLOIISTRUZIONIPour une utilisation correcte, lire attentivement cemode d'emploi.Prima dell'uso, leggere con attenzione questomanuale per poter usare l'unità in maniera corretta.INSTRUCCIONESИНСТРУКЦИЯPara obtener un óptimo rendimiento, leaatentamente este manual antes del uso.Перед использованием тщательно прочтитеруководство, чтобы гарантировать правильную работу.EnglishSC1 Operating ConditionsApplicable Product: DS-5000/DS-5000iD with firmware version 1.04 or later.Applicable software: DSS Player Pro R5 version 5.0.1.0 or higher.Please contact your Olympus dealer if you need any help with checking/updating firmwareand/or software.How to attach and remove the barcode scanner moduleAttaching ( illustration 1)1Remove the SD card from the DS-5000/DS-5000iD SD card slot.2Insert SC1 into the SD card slot.Insert it far enough so that the clasp fastens securely.Removing (illustration 2)1Hold down the release buttons on the sides of the SC1 and pull it out of the SDcard slot.Notes• Make sure that the SC1 is facing the correct direction and insert it in a straight manner.• Never insert or remove the SC1 while the DS-5000/DS-5000iD is ON.• Do not touch the terminal directly with your hand.• Do not apply excessive force when attaching or removing the SC1.How to use the barcode scanner moduleAfter attaching the SC1 to the DS-5000/DS-5000iD, you will be able to input the optionitem value on new files or pre-recorded files by scanning the barcodes.Refer to "Setting the Author ID and Work Type" in the DS-5000/DS-5000iD instructions formore information on option item value.Using the DSS Player software, work type option items input method can be set with thefollowing modes.Individual scanning: Scan each option item individuallyBatch scanning: Scan multiple option items that you have preselected in a single action.You can also set the range of digits in the barcode data for each option item.How to input option item value (
2025-04-14On the beach in the summer.• Do not use organic solvents such as alcohol and lacquer thinner to clean the unit.• Avoid strong vibrations or shocks.• Do not disassemble, repair or modify the unit yourself.• Keep the unit out of the reach of children.User manual laser safety informationThis product complies with 21CFR 1040.10 and 1040.11 except for deviations pursuantto Laser Notice 50, dated June 24, 2007. It also complies with IEC608251:1993+A1:1997+A2:2001 and EN 60825-1:1994+A1:2002+A2:2001.1ClaspFermoirSC1CierreVerschlussGancioЗажимLabel attach positionPosition de l'étiquettePosición de sujeción de la etiquetaPosition für den AufkleberPosizione attacco etichettaМесто для этикеткиэтоFrançaisConditions de fonctionnement du SC1Produit applicable : DS-5000/DS-5000iD avec version micrologicielle 1.04 ou ultérieure.Logiciel applicable : DSS Player Pro R5 version 5.0.1.0 ou supérieure.Veuillez contacter votre revendeur Olympus si vous avez besoin d'aide pour la vérification/mise à jour du micrologiciel et/ou du logiciel.Comment fixer et retirer le module de scanner de code-barresFixation ( illustration 1)1Retirez la carte SD de la fente pour carte SD du DS-5000/DS-5000iD.2Insérez le SC1 dans la fente pour carte SD.Insérez-le assez loin pour que le fermoir s'enclenche fermement.Retrait (illustration 2)1Maintenez les boutons de dégagement enfoncés sur les côtés du SC1 et sortez-lede la fente pour carte SD.Remarques• Assurez-vous que le SC1 se trouve dans le bon sens et insérez-le tout droit.• N'insérez et ne retirez jamais le SC1 lorsque le DS-5000/DS-5000iD est sous tension.• Ne touchez pas la borne directement avec les doigts.• N'appliquez pas de force excessive lors de la fixation ou du retrait du SC1.Comment utiliser le module de scanner de code-barresAprès avoir fixé le SC1 au DS-5000/DS-5000iD, vous pourrez saisir la valeur d'élémentoptionnel des nouveaux fichiers ou des fichiers préenregistrés en balayant les codes-barres.Veuillez consulter la section «Réglage de l'ID auteur et du type de travail» du mode d'emploidu DS-5000/DS-5000iD pour de plus amples informations sur la valeur d'élément optionnel.Avec le logiciel DSS Player,
2025-04-21Que el cierre lo sujete de forma segura.Desacoplamiento ( ilustración 2)1Presione los botones de liberación situados en los laterales del SC1 y extráigalode la ranura de la tarjeta SD.Notas• Asegúrese de que el SC1 esté orientado en la dirección correcta e insértelo sin inclinarlo.• Nunca inserte o extraiga el SC1 mientras la DS-5000/DS-5000iD esté en ON.• No toque el terminal directamente con la mano.• No aplique demasiada fuerza cuando acople o extraiga el SC1.Cómo utilizar el módulo de escaneo de códigos de barraTras acoplar el SC1 a la DS-5000/DS-5000iD, podrá introducir el valor de la opción dearchivos nuevos o pregrabados mediante el escaneado de los códigos de barras.Consulte "Configuración de identificación de autor y tipo de trabajo" en las instruccionesde la DS-5000/DS-5000iD para más información sobre el valor de la opción.Mediante el software DSS Player, el método de introducción del valor de la opción para eltipo de trabajo puede ajustarse con los siguientes modos.Escaneo individual: Escanee cada elemento opcional de forma individual.Escaneo de lotes: Escanee múltiples opciones ya preseleccionadas en una única acción.También puede ajustar el rango de dígitos en los datos del código de barras para cadaelemento opcional.Cómo introducir el valor de la opción ( ilustración 3)1Visualice la pantalla de introducción de la información de archivos mediante losajustes del tipo de trabajo.Consulte "Configuración de identificación de autor y tipo de trabajo" en las instrucciones de la DS-5000 y DS-5000iD para más información sobre los ajustes del tipo de trabajo y la pantalla deintroducción de información de archivos.+2Seleccione la opción que desee introducir medianteo3Pulse el botón F1(SCAN) para escanear el código de barras.Los datos del código de barras escaneado aparecerán en el LCD.El máximo número de caracteres que se puede introducir para un elemento opcional es 20 y deéstos, sólo 16 aparecerán la pantalla LCD.Si quiere continuar introduciendo elementos opcionales
2025-04-201022English Composition II: GT-CO23 ART 1112Art History Renaissance to 1900: GT-AH13 ART 10033-D Design3 ART 1202 or ART 1203 Drawing II (ART 1202) or Figure Drawing (ART 1203)3 GT- AHLIT 1015, HUM 1021/1022, PHI 1011/1012/1013, or Any GT-AH3 Total Credit Hours:15 Third Semester GT- MA1Math for Liberal Arts (MAT 1240) or Any GT-MA13 GT- SC1Any Science (GT-SC1) Course4 GT- SSGEO 1005, ANT 1001, or Any GT-SS3 REQUIRED Any Studio Art Course3 ELECTIVE Any Approved Elective List Course3 Total Credit Hours:16 Fourth Semester GT- SC1/2Any Science (GT-SC1/2) Course3 GT- HI1HIS 1310/1320 or Any GT-HI13 GT- SSGEO 1005, ANT 1001, or Any GT-SS3 ELECTIVE Any Approved Elective List Course3 ELECTIVE Any Approved Elective List Course2 Total Credit Hours:14 Total Credit Hours: 60Important Program Notes:Per the Statewide Transfer Articulation Agreement (STAA), if ART 1002, ART 1111, ART 1112, ART 1113, and/or ART 1201 are not required for the major at a receiving 4-year institution, they will be applied to the Bachelor's degree as elective credit toward graduation. Please check with the receiving institution to determine in which these courses will be applied.Per the Statewide Transfer Articulation Agreement (STAA), you must take two gtPathways Natural & Physical Science courses (GTSC1, GT-SC2). One of these courses must have the required laboratory (GT-SC1).If you take Math for Liberal Arts (MAT 1240) and/or more credits in science than are listed, it will reduce the 8 credits of electives needed. You must complete a minimum of 60 credits to complete this degree. If receiving financial aid, you should only take courses and credits as required for this degree. Check with your advisor to monitor your completion progress.
2025-04-22