Arduino 1 8 11
Author: d | 2025-04-24
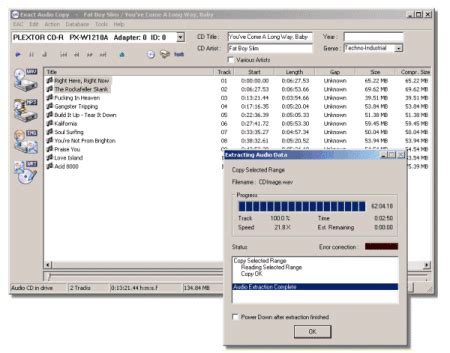
How to install arduino ide in pc /windows 11 /10 /8 / bit How to install and setup arduino ide on windows 11 Making stuff with arduino. How to install arduino software ide on windows 11.
Using arduino and windows 11 s - IDE 1.x - Arduino Forum
Introduction: DIY Room Temperature DetectorNow you can build your own room temperature monitor using an Arduino board. The circuit is a combination of an Arduino UNO board, LM35 temperature sensor, and 7 segment display. It will display the temperature on the 7 segment in degree C. It can be powered from any standard Arduino AC mains adaptor (9VDC), or from a suitable battery. First of all note that this circuit can not measure the temperature of the whole city or province.It can only measure the temperature of the surroundings!Step 1: Things You Will Needyou will need arduino starter kityou can buy kit from hereDiscount coupon code:GBDADDfollowing things will required from the kit:arduino uno.7 segment .LM35(temperature) sensor.A buzzerRGB LED module.connecting wires.A battery.A registor.A bread board A laptop or pc having arduino IDE installed.etc.Step 2: Now make the circuit according to given picture above.connect 2nd pin to 9th pin to seven segment display.arduino pin 7segment pin 2nd => e3rd => d4th => c5th => dp6th => b7th => a8th => f9th => gnow coonect A0 pin arduino to 2nd pin of LM35.now connect RGB led and buzzer to arduino uno pin no.0,1,13 and 12.Step 3: Programming.....Just copy and paste following code into Arduino IDE and burn the code into Arduino UNO///inti=0;intval;int temp=0;void setup(){Serial.begin(9600);pinMode(2,OUTPUT);pinMode(3,OUTPUT);pinMode(4,OUTPUT);pinMode(5,OUTPUT);pinMode(6,OUTPUT);pinMode(7,OUTPUT);pinMode(8,OUTPUT);pinMode(9,OUTPUT);pinMode(10,OUTPUT);pinMode(11,OUTPUT);pinMode(13,OUTPUT);pinMode(12,OUTPUT);pinMode(1,OUTPUT);pinMode(0,OUTPUT);digitalWrite(0,LOW);digitalWrite(12,LOW);digitalWrite(1,LOW);digitalWrite(13,LOW);digitalWrite(10,LOW);digitalWrite(11,LOW);}void loop(){val = analogRead(A0);float mv = ( val/1024.0)*5000; intcel = mv/10;if(cel{digitalWrite(0,HIGH); digitalWrite(1,LOW); digitalWrite(12,LOW); delay(10);digitalWrite(0,LOW); digitalWrite(1,LOW); digitalWrite(12,LOW);digitalWrite(13,LOW); //Serial.println("lower 30");}if(cel>30 &&cel{digitalWrite(0,LOW); digitalWrite(1,HIGH); digitalWrite(12,LOW); delay(10);digitalWrite(0,LOW); digitalWrite(1,LOW); digitalWrite(12,LOW);digitalWrite(13,LOW);//Serial.println("Higher 30");}if(cel>=40){digitalWrite(13,HIGH); digitalWrite(0,LOW); digitalWrite(1,LOW); digitalWrite(12,HIGH); delay(10); digitalWrite(0,LOW); digitalWrite(1,LOW); digitalWrite(12,LOW);digitalWrite(13,LOW);//Serial.println("Higher 40"); }else{digitalWrite(0,LOW); digitalWrite(1,LOW); digitalWrite(12,LOW); }temp=cel/10;digitalWrite(11,HIGH);SevenSegament(temp);digitalWrite(11,LOW);i=cel%10;digitalWrite(10,HIGH);SevenSegament(i);digitalWrite(10,LOW);}voidSevenSegament(int j){if(j==0){digitalWrite(2,LOW);digitalWrite(3,LOW);digitalWrite(4,LOW);digitalWrite(5,HIGH);digitalWrite(6,LOW);digitalWrite(7,LOW);digitalWrite(8,LOW);digitalWrite(9,HIGH);digitalWrite(2,HIGH);digitalWrite(3,HIGH);digitalWrite(4,HIGH);digitalWrite(5,HIGH);digitalWrite(6,HIGH);digitalWrite(7,HIGH);digitalWrite(8,HIGH);digitalWrite(9,HIGH); }if(j==1){digitalWrite(2,HIGH);digitalWrite(3,HIGH);digitalWrite(4,LOW);digitalWrite(5,HIGH);digitalWrite(6,LOW);digitalWrite(7,HIGH);digitalWrite(8,HIGH);digitalWrite(9,HIGH);digitalWrite(2,HIGH);digitalWrite(3,HIGH);digitalWrite(4,HIGH);digitalWrite(5,HIGH);digitalWrite(6,HIGH);digitalWrite(7,HIGH);digitalWrite(8,HIGH);digitalWrite(9,HIGH); }if(j==2){digitalWrite(2,LOW);digitalWrite(3,LOW);digitalWrite(4,HIGH);digitalWrite(5,HIGH);digitalWrite(6,LOW);digitalWrite(7,LOW);digitalWrite(8,HIGH);digitalWrite(9,LOW);digitalWrite(2,HIGH);digitalWrite(3,HIGH);digitalWrite(4,HIGH);digitalWrite(5,HIGH);digitalWrite(6,HIGH);digitalWrite(7,HIGH);digitalWrite(8,HIGH);digitalWrite(9,HIGH);
arduino/Arduino: Arduino IDE 1.x - GitHub
Arduino Code The Arduino IDE includes an example of using theLCD library which we will use. You can find this on the File menuunder Examples → Liquid Crystal → HelloWorld.This example uses different pins to the ones weuse, so find the line of code below: LiquidCrystal lcd(12, 11, 5, 4, 3, 2); and change it to be: LiquidCrystal lcd(7, 8, 9, 10, 11, 12); Upload the code to your Arduino board and youshould see the message 'hello, world' displayed, followed by a numberthat counts up from zero.The first thing of note in the sketch is the line: #include This tells Arduino that we wish to use the LiquidCrystal library.Next we have the line that we had to modify. Thisdefines which pins of the Arduino are to be connected to which pinsof the display. LiquidCrystal lcd(7, 8, 9, 10, 11, 12); The arguments to this are as follows: Display Pin NameDisplay Pin NumberArduino Pin (in this example)RS47E68D4119D51210D61311D71412 After uploading this code, make sure the backlight is lit up, and adjust the potentiometer all the way around until you see the text message In the 'setup' function, we have two commands: lcd.begin(16, 2); lcd.print("hello, world!"); The first tells the Liquid Crystal library how many columns and rows the display has. The second line displays the message that we see on the first line of the screen.In the 'loop' function, we also have two commands: lcd.setCursor(0, 1); lcd.print(millis()/1000); The first sets the cursor position (where the nexttext will appear) to column 0 & row 1. Both column and row numbersstart at 0 rather than 1.The second line displays the number ofmilliseconds since the Arduino was reset. Page last edited March 08, 2024 Text editor powered by tinymce.1 สอน Arduino วิธีติดตั้งโปรแกรม Arduino IDE
13 GPIO pins and 8 analog inputs, which can also be used as GPIO. This gives you a total of 21 IO lines, exactly the amount of IO needed to run the LED cube!But why write about it when we could just show you?We hooked the cube up to an Arduino and ported some of the software.Since the multiplexer array and AVR board are separated by a ribbon cable, connecting the IO lines to an Arduino is a simple matter of connecting some breadboard wires. Luckily, we soldered in a female 0.1" pin header for the transistor lines when we were debugging the first set of transistors. Just remove the ATmega and connect wires from the Arduino to these pin headers.We connected the cube like this: DATA bus: Digital pins 0-7. This corresponds to PORTD on the ATmega328 on the Arduino board, so we can use direct port access instead of Arduinos digitalWrite (which is slow). Address bus: Digital pins 8-10. This corresponds to PORTB bit 0-2. On this we HAVE to use direct port access. Arduinos digitalWrite wouldn't work with this, because you can't set multiple pins simultaneously. If the address pins are not set at the exact same time, the output of the 74HC138 would trigger the wrong latches. Output Enable: Digital pin 11. Layer transistors: Analog pins 0-5 and digital pins 12 and 13.We had to go a bit outside the scope of the Arduino platform. The intention of Arduino is to use digitalWrite() for IO port access, to make the code portable and some other reasons. We had to sidestep that and access the ports directly. In addition to that, we had to use one of the timers for the interrupt routine.The registers for the interrupt and timers are different on different AVR models, so the. How to install arduino ide in pc /windows 11 /10 /8 / bit How to install and setup arduino ide on windows 11 Making stuff with arduino. How to install arduino software ide on windows 11. How to install arduino ide in pc /windows 11 /10 /8 / bit How to install and setup arduino ide on windows 11 Making stuff with arduino.Reading 8 buttons and 1 joystick Arduino to max - Cycling '74
Medallion Cabinetry Information: flowcode with book. flowcode 5 pic crack. flowcode avr crack rar. flowcode5goodqualityrar.. Here you .... FlowCode 7.1.1.0 Crack And Full Version Free Download. FlowCode 8 ... FlowCode 8 serial key software is an easy and effective solution for programming Atmel Avr, Arduino, and arm based devices. ... Just click when download finish now uses RAR software for UNRAR. ... Actix Analyzer 5-5-349 Crack.. تحميل و تتبيث البرنامج الشهير Flowcode V5 --téléchargement et installation Flowcode V5 ... flowcode v5 with crack/flowcode v6 with crack has been upload on the given link ... .mediafire.com/download/2gi7k8y4pdfqawy/FlowcodeV5-PICmicro-Demo.rar. ... Flowcode AVR Tutorial : Designing, compiling and Debugging .... PSLOmyimzip ✫ 1; 2; 3; 4; 5; 6; 7; 8; 9; 10; 11; 12; 13; 1. ... Flowcode V5 Avr Crack Rar · Photoshop 10000 Actions .... It's also an easy and effective solution for programming Atmel AVR, Arduino and ARM based devices. With a flexible licencing structure including a free version of .... flowcode, flowcode 8 crack, flowcode tutorial, flowcode technologies, flowcode download, flowcode projects, flowcode 8 price, flowcode .... unity3D 3.5.4 crack license.rar . free indian nude bhabhi photos-adds Fumetto Erotico .... Pipesflowcode v4 arm. flowcode 5 pic crack. flowcode avr v4 .. This is .... Should I remove Flowcode V5 for dsPIC/PIC24 - free version by Matrix ... in our database: flowcode pic24&dspic v4.4.13.69 full.rar from 4shared.com ... ARM-AVR-PIC-PIC24-dsPIC crack. . v4. matrix multimedia flowcode 5... flowcode crack, flowcode pro, flowcode free download, flowcode portable, ... flowcode pro v5 crackrar benny benassiArduino IDE - IDE 1.x - Arduino Forum
Board. Applying a small amount of super glue to the sides of the Connect 4 where it meets the box will ensure it will not move, and make a sturdy base for our binary clock. Step 8: Programming the Arduino Alright, set aside the box and LED's for now, and head to your computer - it's Arduino time!Now don't be scared - Arduino programming is actually pretty easy, but we've been kind enough to supply you with the code, so you won't have to program a thing. After numerous grueling attempts at creating a code from scratch, and even more abysmal failures later, we found a delightful code courtesy of fellow Instructable member cwik! Head over to his page and check out some pretty neat projects.Download the code provided in this step, and open it up in as a text file. Open up the Arduino sketch environment, and paste all of that code into a new Arduino sketch. If you don't have the Arduino software, you can download it here. Don't worry, it's free - isn't open-source awesome?Now here comes the only part where you have to look at the code. Experienced hackers will notice that there's a lot of code that is pretty much unnecessary, as cwik is utilizing potentiometers, analog meters, switches, and other awesome stuff. Don't worry, we're not going to use any of that, and the code will perform perfectly regardless. Scroll down - about 1/4 of the way down the code - until you find the void setup() function. In that function, at the bottom, you'll see the following three lines of code:// initialize clock variables m_lastTick = 0; setTime(0, 0, 0);This is where we're going to input the current time of day. The last line, "setTime(0,0,0):" is setup so that we can input whatever time we want, in the format of "setTime(Hour, Minute, Second);". Take a look at your computer, watch, sundial or clock and input the time. Keep in mind that this is a 24-hour clock, not a 12-hour, so you'll need to enter it army-style. We've heard many "best ways" to get from army-time to the 12-hour clock, but its really as simple as subtracting 12 from the hour. For example, if the clock reads 18:35, it's 6:35pm (18-12 = 6), or if it's 23:10, its 11:10pm (23-12 = 11). So, do some quick addition/subtraction, and input your time into this field,Arduino unresponsive - IDE 1.x - Arduino Forum
Introduction: Arduino Binary Clock - 3D PrintedI've been looking at Binary clocks for some time for my office desk, however they're quite expensive and / or don't have a huge amount of features. So I decided I would make one instead. One point to consider when making a clock, Arduino / Atmega328 isn't very accurate over larger periods of time (some people have seen more than 5 minutes of error in 24 hours) so for this project we'll use an RTC (Real Time Clock) Module to keep the time. These also have an added bonus that they have their own back up battery so the time won't be lost in case of power failure. I opted for the DS3231 module as its acurate to 1 minute per year but you could also use a DS1307 but its not as accurate. Obviously you don't need to use all these features, you could just make the basic binary clock and save maybe £10 - to £12 in the process. I went for a 12 hour clock format to keep the size down and to reduced LED counts and it's easier to read too. (Common sense is all you usually need to work out if its AM or PM!!)I used:1 x Arduino Nano (one of the cheap ebay one's) - Approx £31 x RTC Module (i2C) - Approx £31x RHT03 Temperature / humidity sensor - Approx £41x 0.96" OLED Screen Module (i2C) - Approx £511 x Blue straw hat LED's - Approx £211 x 470Ohm resistor - Approx £11 x 10KOhm Resistor - Approx £0.301 x 3D printed housing - Approx £12plus a small amount of strip board and solderTotal Build cost = £30Step 1: Build the LED ModulesThe LED modules are made up of 3 or 4 LED's which have the positive legs connected together and the negative legs connected to a 470Ohm resistor. This resistor limits the current through LED to about 5mA. The maximum number of LED's that can be on at any time is 8, so the maximum current draw on the Arduino is about 40mA in and 40mA out so 80mA total - well within the comfort region of the arduino.Fly leads are then soldered on and the resistors covered with heat shrink tubes.Step 2: Binary Clock CIrcuitThe hub of this project is the Arduino Nano. We're going to use most of it's pins here. The RTC module and Screen are both on the i2C bus so they can share all connections. Simple connect the 5v, 0v, SDA and SCL connections to both modules (I daisy chained mine to keep the wiring down). SDA is then connected to pin A4 on the arduino and SCL is connected to. How to install arduino ide in pc /windows 11 /10 /8 / bit How to install and setup arduino ide on windows 11 Making stuff with arduino. How to install arduino software ide on windows 11. How to install arduino ide in pc /windows 11 /10 /8 / bit How to install and setup arduino ide on windows 11 Making stuff with arduino.Comments
Introduction: DIY Room Temperature DetectorNow you can build your own room temperature monitor using an Arduino board. The circuit is a combination of an Arduino UNO board, LM35 temperature sensor, and 7 segment display. It will display the temperature on the 7 segment in degree C. It can be powered from any standard Arduino AC mains adaptor (9VDC), or from a suitable battery. First of all note that this circuit can not measure the temperature of the whole city or province.It can only measure the temperature of the surroundings!Step 1: Things You Will Needyou will need arduino starter kityou can buy kit from hereDiscount coupon code:GBDADDfollowing things will required from the kit:arduino uno.7 segment .LM35(temperature) sensor.A buzzerRGB LED module.connecting wires.A battery.A registor.A bread board A laptop or pc having arduino IDE installed.etc.Step 2: Now make the circuit according to given picture above.connect 2nd pin to 9th pin to seven segment display.arduino pin 7segment pin 2nd => e3rd => d4th => c5th => dp6th => b7th => a8th => f9th => gnow coonect A0 pin arduino to 2nd pin of LM35.now connect RGB led and buzzer to arduino uno pin no.0,1,13 and 12.Step 3: Programming.....Just copy and paste following code into Arduino IDE and burn the code into Arduino UNO///inti=0;intval;int temp=0;void setup(){Serial.begin(9600);pinMode(2,OUTPUT);pinMode(3,OUTPUT);pinMode(4,OUTPUT);pinMode(5,OUTPUT);pinMode(6,OUTPUT);pinMode(7,OUTPUT);pinMode(8,OUTPUT);pinMode(9,OUTPUT);pinMode(10,OUTPUT);pinMode(11,OUTPUT);pinMode(13,OUTPUT);pinMode(12,OUTPUT);pinMode(1,OUTPUT);pinMode(0,OUTPUT);digitalWrite(0,LOW);digitalWrite(12,LOW);digitalWrite(1,LOW);digitalWrite(13,LOW);digitalWrite(10,LOW);digitalWrite(11,LOW);}void loop(){val = analogRead(A0);float mv = ( val/1024.0)*5000; intcel = mv/10;if(cel{digitalWrite(0,HIGH); digitalWrite(1,LOW); digitalWrite(12,LOW); delay(10);digitalWrite(0,LOW); digitalWrite(1,LOW); digitalWrite(12,LOW);digitalWrite(13,LOW); //Serial.println("lower 30");}if(cel>30 &&cel{digitalWrite(0,LOW); digitalWrite(1,HIGH); digitalWrite(12,LOW); delay(10);digitalWrite(0,LOW); digitalWrite(1,LOW); digitalWrite(12,LOW);digitalWrite(13,LOW);//Serial.println("Higher 30");}if(cel>=40){digitalWrite(13,HIGH); digitalWrite(0,LOW); digitalWrite(1,LOW); digitalWrite(12,HIGH); delay(10); digitalWrite(0,LOW); digitalWrite(1,LOW); digitalWrite(12,LOW);digitalWrite(13,LOW);//Serial.println("Higher 40"); }else{digitalWrite(0,LOW); digitalWrite(1,LOW); digitalWrite(12,LOW); }temp=cel/10;digitalWrite(11,HIGH);SevenSegament(temp);digitalWrite(11,LOW);i=cel%10;digitalWrite(10,HIGH);SevenSegament(i);digitalWrite(10,LOW);}voidSevenSegament(int j){if(j==0){digitalWrite(2,LOW);digitalWrite(3,LOW);digitalWrite(4,LOW);digitalWrite(5,HIGH);digitalWrite(6,LOW);digitalWrite(7,LOW);digitalWrite(8,LOW);digitalWrite(9,HIGH);digitalWrite(2,HIGH);digitalWrite(3,HIGH);digitalWrite(4,HIGH);digitalWrite(5,HIGH);digitalWrite(6,HIGH);digitalWrite(7,HIGH);digitalWrite(8,HIGH);digitalWrite(9,HIGH); }if(j==1){digitalWrite(2,HIGH);digitalWrite(3,HIGH);digitalWrite(4,LOW);digitalWrite(5,HIGH);digitalWrite(6,LOW);digitalWrite(7,HIGH);digitalWrite(8,HIGH);digitalWrite(9,HIGH);digitalWrite(2,HIGH);digitalWrite(3,HIGH);digitalWrite(4,HIGH);digitalWrite(5,HIGH);digitalWrite(6,HIGH);digitalWrite(7,HIGH);digitalWrite(8,HIGH);digitalWrite(9,HIGH); }if(j==2){digitalWrite(2,LOW);digitalWrite(3,LOW);digitalWrite(4,HIGH);digitalWrite(5,HIGH);digitalWrite(6,LOW);digitalWrite(7,LOW);digitalWrite(8,HIGH);digitalWrite(9,LOW);digitalWrite(2,HIGH);digitalWrite(3,HIGH);digitalWrite(4,HIGH);digitalWrite(5,HIGH);digitalWrite(6,HIGH);digitalWrite(7,HIGH);digitalWrite(8,HIGH);digitalWrite(9,HIGH);
2025-04-11Arduino Code The Arduino IDE includes an example of using theLCD library which we will use. You can find this on the File menuunder Examples → Liquid Crystal → HelloWorld.This example uses different pins to the ones weuse, so find the line of code below: LiquidCrystal lcd(12, 11, 5, 4, 3, 2); and change it to be: LiquidCrystal lcd(7, 8, 9, 10, 11, 12); Upload the code to your Arduino board and youshould see the message 'hello, world' displayed, followed by a numberthat counts up from zero.The first thing of note in the sketch is the line: #include This tells Arduino that we wish to use the LiquidCrystal library.Next we have the line that we had to modify. Thisdefines which pins of the Arduino are to be connected to which pinsof the display. LiquidCrystal lcd(7, 8, 9, 10, 11, 12); The arguments to this are as follows: Display Pin NameDisplay Pin NumberArduino Pin (in this example)RS47E68D4119D51210D61311D71412 After uploading this code, make sure the backlight is lit up, and adjust the potentiometer all the way around until you see the text message In the 'setup' function, we have two commands: lcd.begin(16, 2); lcd.print("hello, world!"); The first tells the Liquid Crystal library how many columns and rows the display has. The second line displays the message that we see on the first line of the screen.In the 'loop' function, we also have two commands: lcd.setCursor(0, 1); lcd.print(millis()/1000); The first sets the cursor position (where the nexttext will appear) to column 0 & row 1. Both column and row numbersstart at 0 rather than 1.The second line displays the number ofmilliseconds since the Arduino was reset. Page last edited March 08, 2024 Text editor powered by tinymce.
2025-04-23Medallion Cabinetry Information: flowcode with book. flowcode 5 pic crack. flowcode avr crack rar. flowcode5goodqualityrar.. Here you .... FlowCode 7.1.1.0 Crack And Full Version Free Download. FlowCode 8 ... FlowCode 8 serial key software is an easy and effective solution for programming Atmel Avr, Arduino, and arm based devices. ... Just click when download finish now uses RAR software for UNRAR. ... Actix Analyzer 5-5-349 Crack.. تحميل و تتبيث البرنامج الشهير Flowcode V5 --téléchargement et installation Flowcode V5 ... flowcode v5 with crack/flowcode v6 with crack has been upload on the given link ... .mediafire.com/download/2gi7k8y4pdfqawy/FlowcodeV5-PICmicro-Demo.rar. ... Flowcode AVR Tutorial : Designing, compiling and Debugging .... PSLOmyimzip ✫ 1; 2; 3; 4; 5; 6; 7; 8; 9; 10; 11; 12; 13; 1. ... Flowcode V5 Avr Crack Rar · Photoshop 10000 Actions .... It's also an easy and effective solution for programming Atmel AVR, Arduino and ARM based devices. With a flexible licencing structure including a free version of .... flowcode, flowcode 8 crack, flowcode tutorial, flowcode technologies, flowcode download, flowcode projects, flowcode 8 price, flowcode .... unity3D 3.5.4 crack license.rar . free indian nude bhabhi photos-adds Fumetto Erotico .... Pipesflowcode v4 arm. flowcode 5 pic crack. flowcode avr v4 .. This is .... Should I remove Flowcode V5 for dsPIC/PIC24 - free version by Matrix ... in our database: flowcode pic24&dspic v4.4.13.69 full.rar from 4shared.com ... ARM-AVR-PIC-PIC24-dsPIC crack. . v4. matrix multimedia flowcode 5... flowcode crack, flowcode pro, flowcode free download, flowcode portable, ... flowcode pro v5 crackrar benny benassi
2025-04-14Board. Applying a small amount of super glue to the sides of the Connect 4 where it meets the box will ensure it will not move, and make a sturdy base for our binary clock. Step 8: Programming the Arduino Alright, set aside the box and LED's for now, and head to your computer - it's Arduino time!Now don't be scared - Arduino programming is actually pretty easy, but we've been kind enough to supply you with the code, so you won't have to program a thing. After numerous grueling attempts at creating a code from scratch, and even more abysmal failures later, we found a delightful code courtesy of fellow Instructable member cwik! Head over to his page and check out some pretty neat projects.Download the code provided in this step, and open it up in as a text file. Open up the Arduino sketch environment, and paste all of that code into a new Arduino sketch. If you don't have the Arduino software, you can download it here. Don't worry, it's free - isn't open-source awesome?Now here comes the only part where you have to look at the code. Experienced hackers will notice that there's a lot of code that is pretty much unnecessary, as cwik is utilizing potentiometers, analog meters, switches, and other awesome stuff. Don't worry, we're not going to use any of that, and the code will perform perfectly regardless. Scroll down - about 1/4 of the way down the code - until you find the void setup() function. In that function, at the bottom, you'll see the following three lines of code:// initialize clock variables m_lastTick = 0; setTime(0, 0, 0);This is where we're going to input the current time of day. The last line, "setTime(0,0,0):" is setup so that we can input whatever time we want, in the format of "setTime(Hour, Minute, Second);". Take a look at your computer, watch, sundial or clock and input the time. Keep in mind that this is a 24-hour clock, not a 12-hour, so you'll need to enter it army-style. We've heard many "best ways" to get from army-time to the 12-hour clock, but its really as simple as subtracting 12 from the hour. For example, if the clock reads 18:35, it's 6:35pm (18-12 = 6), or if it's 23:10, its 11:10pm (23-12 = 11). So, do some quick addition/subtraction, and input your time into this field,
2025-04-20#parse the xml from the string dom = parseString(data) #retrieve the first xml tag (data) that the parser finds with name tagName change tags to get different data xmlTag = dom.getElementsByTagName('title')[1].toxml() # the [2] indicates the 3rd title tag it finds will be parsed, counting starts at 0 if xmlTag != datamem: #strip off the tag (data ---> data) xmlData=xmlTag.replace(' ','') #write the marker ~ to serial ser.write(b"~") time.sleep(5) #split the string into individual words nums = xmlData.split(' ') #loop until all words in string have been printed for num in nums: #write 1 word ser.write(bytes(num, 'UTF-8')) # write 1 space ser.write(bytes(' ', 'UTF-8')) # THE DELAY IS NECESSARY. It prevents overflow of the arduino buffer. time.sleep(2) # write ~ to close the string and tell arduino information sending is finished ser.write(b"~") # wait 5 minutes before rechecking RSS and resending data to Arduino datamem = xmlTag time.sleep(30) else: time.sleep(60) #download the rss file feel free to put your own rss url in here file2 = urllib.request.urlopen(' #convert to string data2 = file2.read() #close the file file2.close() #parse the xml from the string dom2 = parseString(data2) #retrieve the first xml tag (data) that the parser finds with name tagName change tags to get different data xmlTag2 = dom2.getElementsByTagName('title')[1].toxml() # the [2] indicates the 3rd title tag it finds will be parsed, counting starts at 0 if xmlTag2 != datamem2: #strip off the tag (data ---> data) xmlData2=xmlTag2.replace(' ','') #write the marker ~ to serial ser.write(b"~") time.sleep(5) #split the string into individual words nums = xmlData2.split(' ') #loop until all words in string have been printed for num in nums: #write 1 word ser.write(bytes(num, 'UTF-8')) # write 1 space ser.write(bytes(' ', 'UTF-8')) # THE DELAY IS NECESSARY. It prevents overflow of the arduino buffer. time.sleep(2) # write ~ to close the string and tell arduino information sending is finished ser.write(b"~") # wait 5 minutes before rechecking RSS and resending data to Arduino datamem2 = xmlTag2 time.sleep(120) else: time.sleep(60)Step 6: Getting It to WorkUpload the Arduino Code to the Arduino itself. Put the Python code into a .py file. If all goes according to plan, if you run the .py file, you should see the text start appearing after about 10 seconds. Every time a word is outputted, the LED should flash and the servo moves as well.If it doesn't work:Check the port in the python file. Your Arduino may be labeled differently or be numbered differently.Check that the RSS feed doesn't have a ~ in the data. That will throw things out of whack.Try running the .py file from the command line as an administrator. Sometimes the script doesn't have proper permissions to access the COM ports
2025-04-20Introduction: Arduino Push Button Counter With LED Indication In this tutorial I am going to to explain you how to make push button counter with LED indicatorusing arduino UNO.Clear we will control for LED with single push button, but if you want to control more LED then you need to add more case.Step 1: Required ComponentsArduino UNO - X1Breadboard - X1LED- X1150ohm Resistor- X410K ohm Resistor -X1Push - X1Jumper cables(You can use 100 Ohm to 1K ohm Resistor to connect with LED , here i connect 150ohm resistor with LED)And arduino IDE for programming arduino Uno boardStep 2: Circuit Connectionarduino (5V) -- push button(A1)arduino (D5) -- push button(B1)arduino (D6, D7, D8, D9) -- Resistor(150ohm) -- LED's (positive terminal)arduino(GND) -- LED(negative terminal)arduino(GND) -- Resistor(10K) -- push button(B2)Step 3: Program This is the code for our project you can copy from here or you can download the file given belowint count=0;int newcount;void setup() {Serial.begin(9600); pinMode(5,INPUT); pinMode(6,OUTPUT);pinMode(7,OUTPUT);pinMode(8,OUTPUT);pinMode(9,OUTPUT);}void loop() { if(digitalRead(5)==HIGH) { newcount=count+1; if(newcount!=count) { Serial.println(newcount); switch (newcount) { case 1: digitalWrite(6,HIGH); break; case 2: digitalWrite(7,HIGH); break;case 3: digitalWrite(8,HIGH); break; case 4: digitalWrite(9,HIGH); break; default: digitalWrite(6,LOW); digitalWrite(7,LOW); digitalWrite(8,LOW); digitalWrite(9,LOW); newcount=0; break; } count=newcount; } } delay(100);}---------------------------------------------------------------------------------------------------------------------------Downloading .ino file :-(1.) download .ino file given below(2.) go to >> documents > arduino > now make here folder having same name as file name(make folder having name - "switch_case_with_mult_leds" )(3.) Now add the downloaded file in this folder. Step 4: TroubleshootAfter uploading this post when i use this circuit again then i found an issue :- when i pressed the button only one time then our board will performs instructions of case2 and case3 along with case1 as well, which means when i pressed the button 1st time then along with 1st LED ,my 2nd and 3rd LED also turned on But i want that when i press button then LED will turned on ONE BY ONE .Thats why i use remove delay(100) from last line ,and i write delay(500), before switch statementSo now whenever i pressed the push button then after 500millisecond our single LED will turn ONyou can copy the code from belowint count=0;int newcount;
2025-04-21