Autohotkey script to hold down a key
Author: e | 2025-04-24
Autohotkey script to hold F key Informative/Guide I'm seeing a lot of people building contraptions to hold the F key, and I wanted to share my primitive autohotkey (2.0) script that holds down Autohotkey script to hold F key . Informative/Guide I'm seeing a lot of people building contraptions to hold the F key, and I wanted to share my primitive autohotkey (2.0) script that holds down

Script for holding down one key to hold down another key - AutoHotkey
If you need to hold down a key automatically on Windows 10, you can do it with a simple trick using built-in settings or third-party software. Essentially, you can use the Windows on-screen keyboard, enable a feature called "Sticky Keys," or use programs like AutoHotkey for more advanced needs. Let’s dive into the steps for each method.In this section, we’ll go through a few methods you can use to hold down a key automatically on your Windows 10 computer. We’ll start with the easiest option using built-in settings and then move on to more advanced methods involving third-party software.Step 1: Open the On-Screen KeyboardThe first step is to open the on-screen keyboard on your Windows 10 computer.Simply go to the Start menu, type "On-Screen Keyboard," and hit Enter. This will open the on-screen keyboard, which can be used to simulate key presses.Step 2: Enable Sticky KeysThe second step is to enable Sticky Keys from the Ease of Access settings.Press the Shift key five times in a row, and a prompt will appear asking if you want to enable Sticky Keys. Confirm to enable this feature. Sticky Keys will allow you to hold down a key without physically pressing and holding it.Step 3: Use AutoHotkey for Advanced NeedsIf the built-in options aren’t enough, the third step is to use AutoHotkey for more control.Download and install AutoHotkey from its official website. This tool lets you create scripts to automate key presses. Create a new AutoHotkey script and use a simple loop to hold down a key. For example, the script ^a::Send {a Down} will hold down the ‘A’ key when you press Ctrl+A.Step 4: Run Your AutoHotkey ScriptThe next step is to run your newly created AutoHotkey script.Double-click on the script file to run it. Your specified key will now be held down automatically according to the script you’ve written.Step 5: Disable Sticky Keys or Close AutoHotkeyFinally, if you want to stop holding the key down automatically, you need to disable the feature you used.For Sticky Keys, go to Ease of Access settings and turn it off. For AutoHotkey, right-click the AutoHotkey icon in the system tray and choose "Exit."After completing these steps, your key will be held down automatically, allowing you to perform tasks without manually pressing the key. This can be particularly useful for gaming, repeated tasks, or accessibility needs.Tips for Holding Down a Key Automatically on Windows 10Experiment with Built-In Features: Before downloading third-party software, see if built-in features like Sticky Keys meet your needs.Use AutoHotkey for Customization: AutoHotkey lets you create highly customized scripts, making it ideal for complex tasks.Keep Security in Mind: Only download AutoHotkey from its official website to avoid security risks.Save Your Scripts: Keep a backup of your frequently used AutoHotkey scripts for easy access.Test Your Setup: Make sure to test your setup to ensure that it works smoothly without interfering with other tasks.Frequently Asked QuestionsHow do I enable Sticky Keys on Windows 10?Press the Shift key five times and confirm the prompt to enable
Script to hold down key - somewhat random - AutoHotkey
The same action as Control + Click, or right-click, with your mouse.If you're using the numeric keypad, you can press Control + 0 instead.To press and hold the "mouse button," press M on the keyboard, or 0 on the numeric keypad. This will allow you to activate certain menus (e.g., the Trash menu). Since you can't type while using Mouse Keys, press Option 5 times to disable the feature. Alternatively, you can triple-tap the Touch ID button (if available), or press Option + Command + F5 and remove the checkmark from the feature.AdvertisementGo to in a web browser. AutoHotkey is a free scripting language available on Windows that allows you to create your own keyboard shortcuts. Assigning a key combination to click is quick and straightforward.If your mouse isn't working, use Mouse Keys to download, install, and configure AutoHotKey.Take a look at our guide on using AutoHotkey for general information on installation and scripting. Follow these steps to download the installation file:Click Download. It’s the green button in the center of the page. Download options will appear on the page.Click Download Current Version. This will download the installation file for the latest version of AutoHotkey. Double-click the file you downloaded to start the installation process.The file name will be formatted as “AutoHotkey_version number_setup.”Your downloaded files can be found in your Downloads folder by default. Follow the installation instructions to finish installing AutoHotkey.Express Installation will install AutoHotkey on your computer with the default configuration.When it's finished installing, you can click "Run AutoHotkey" to launch some of the documentation about AutoHotkey. Right-clicking on a blank part of your desktop will open a drop-down menu. This will open a list of programs you can create a new file for. This will create a new AutoHotkey script on your desktop. It will have an image of a white paper with a red “H” on it.You can rename the file while the default name is highlighted. For example, “Click Keyboard Shortcut.”Make sure not to delete the file extension “.ahk” at the end of the file name. Deleting it may cause the script to stop working. Right-click the new script. Then select Edit Script in the dropdown menu. The AutoHotkey script will open in Notepad. This script from the AutoHotkey documentation will allow you to press left Windows + right Control to left-click.[8] Start typing below the default AutoHotkey code. Note that each bullet point ofMaking a script to hold down a key. - AutoHotkey Community
Isn't it annoying when almost identical apps use different key combinations to achieve the same outcome? Even worse, don't you hate it when a piece of software insists on using obscure keyboard shortcuts without offering an option to remap them? Wouldn't it be great to have absolute control over how your keyboard functions in every application? Well, that's possible, thanks to AutoHotkey. With AutoHotkey, you can remap your whole keyboard or create custom shortcuts, both "globally" and for each application individually. If you wish, you can even have custom strings of text—or even whole templates—for each app bound to the same key combinations. You only need AutoHotkey and a text editor—even Notepad will do. Sounds interesting? Then let's hop right in. Getting Started With Windows Spy in AutoHotKey Nowadays, many keyboards come with software for creating custom shortcuts and macros. However, as we will see, AutoHotkey is more versatile since it's keyboard-agnostic. With it, your "keyboard customizations" won't be tied to a particular keyboard. You'll be able to take your customization script to other computers and have your custom app shortcuts and shortcodes up and running in no time. Since in this article we're hitting the ground running, if you'd like a proper introduction to AutoHotkey, check our quick AutoHotkey Guide for Beginners. Start by downloading AutoHotkey from its official site. Then, install it like any other app. You don't have to run it afterward. It springs into action automatically when you run a script made for it. So, let's create such a script. With AutoHotkey installed, right-click anywhere, on your desktop or inside a folder where you want to create your script. Choose New > AutoHotkey Script. Give your script-to-be a name and press Enter. With AutoHotkey, you can create "global" shortcuts that will be active everywhere or app-specific ones that will work only inside an active application's window. To "target" a specific application, you must identify it in your script. AutoHotkey can help with that through its Window Spy. Double-click on your currently blank script to run it, and with it, AutoHotkey. Right-click on AutoHotkey's icon on the Windows tray, and choose Window Spy from the menu that pops up. To find the identifiers needed to target an application, leave Window Spy on your screen, and click on your app's window. Then, notice the ahk_class, ahk_exe, and ahk_pid entries, at the top of Window Spy's window. In our case, we wanted to target the popular Obsidian note-taking application. Since other software could have a similar ahk_class and ahk_pid, we used its executable file as our target, using ahk_exe Obsidian.exe, as mentioned in Window Spy. When you know your target, it's time to script. Time to Make a Script. Autohotkey script to hold F key Informative/Guide I'm seeing a lot of people building contraptions to hold the F key, and I wanted to share my primitive autohotkey (2.0) script that holds down Autohotkey script to hold F key . Informative/Guide I'm seeing a lot of people building contraptions to hold the F key, and I wanted to share my primitive autohotkey (2.0) script that holds downHold down key to pause script - AutoHotkey Community
Hi @monolitho,Welcome to HP Support Community.Thank you for posting your query, I will be glad to help you.To repurpose the OMEN key on an HP OMEN laptop or keyboard and use it as a screen switch to turn the screen on or off with a single click, you'll need to follow a multi-step process. This involves remapping the OMEN key to a different function that can then be used to control the screen's power state. Here's a general guide on how to achieve this:Step 1: Identify the OMEN Key CodeFirst, you need to identify the scan code or key code that your system recognizes when you press the OMEN key. This can usually be done using key mapping software or by checking the system's event viewer for keyboard events. However, it's worth noting that the OMEN key might not send a standard key code that's easily remappable without specific software provided by HP or third-party key mapping tools.Step 2: Install Key Mapping SoftwareIf the OMEN key can be remapped, you will need to use key mapping software. For Windows, software like SharpKeys, KeyTweak, or AutoHotkey can be used. AutoHotkey, in particular, is very versatile and allows for scripting complex behaviors for keys. SharpKeys or KeyTweak: These tools provide a GUI for remapping keys. You can use them if the OMEN key is recognized and can be remapped to a different function directly. AutoHotkey: This is a more powerful tool that can run scripts to perform specific actions when a key is pressed.Step 3: Write a Script to Toggle the Screen (AutoHotkey Example)If you're using AutoHotkey, you'll need to write a script that toggles the screen on or off. Here's a simple script example that does this by simulating the press of the Win+P keys twice, which cycles through the display modes and can effectively turn off the screen if it's set to "PC screen only" initially:autohotkeyCopy codeOMENKey:: ; Replace OMENKey with the actual key or combination if needed Send, {LWin down}{P down}{P up}{LWin up} Sleep, 100 ; Wait a bit for the menu to appear Send, {P down}{P up} return Note: This script assumes that pressing Win+P twice will result in turning off the screen, which might not always be the case depending on your display settings. You might need a more sophisticated script that directly turns the screen off.Step 4: Set the Script to Run at StartupIf you're using AutoHotkey, you can compile the script into an executable and place it in your startup folder so it runs automatically when you log into Windows.Additional Considerations Direct Screen Control: For more direct control over the screen (e.g., using the Windows API to turn the screen off), you might need a more complex script or application. This could involve programming beyond simple key remapping. OMEN Command Center: Check if the OMEN Command Center (or HP System Event Utility) offers any native support for customizing the OMEN key. Some versions of the software might allow you to remap the key without needingHold down key script? : r/AutoHotkey - Reddit
SummaryHold down a hotkey to turn your trackball into a scroll wheel!You can either set it to snap to the X-Y axes, or have it scroll along both axes at once to emulate 2D panning!You don't have to install AutoHotKey to use this - check the releases for a .exe download.Other people have written several great alternatives to this script, such as TrackballScroll.However, this script seeks to differentiate itself by implementing continuous scrolling motion, as opposed to stepped.SettingsSetting Your Hotkeys:Hotkey 1: What key to use as the hotkey.See the AHK docs for more information on how to format this.Only single keys (keyboard or mouse) can be used - no combinations or modifiers.If you end up accidently locking yourself out of your system, first use CTRL+SHIFT+ESCAPE to launch task manager and kill smooth_trackball_scrolling.exe. Then, run smooth_trackball_scrolling_reset.exe. This will reset all your settings back to default.Hotkey 2: A second hotkey, if you're using a 2 key mode. See below for more details.Formatted the same way as Hotkey 1.Setting Hotkey Mode:Mode: Provides various options depending on how you want things to work.MO (1 key): Smooth scrolling is active when Hotkey 1 is held, and inactive when Hotkey 1 isn't held. Hotkey 2 doesn't do anything.TG (1 key): Smooth scrolling is toggled when Hotkey 1 is pressed down. Hotkey 2 doesn't do anything.MO (2 key sym.): Smooth scrolling is active when Hotkey 1 and Hotkey 2 are both held.You can start holding the two hotkeys in either order.The original functionality of both hotkeys can still be used by tapping/holding the key individually.If you tap a hotkey individually, the tap action will be sent upon key release.If you hold a hotkey individually, the hold will start after a hold delay (configurable via Hold Duration).MO (2 key asym.): Smooth scrolling is active when Hotkey 1 andAutohotkey Hold down a key
I like using my AutoHotKey script since the rundll... command is dependent on the 'hibernate' state and the Sleep script command is not dependent on whether 'hibernate' is enabled or disabled. If the CMD (rundll...) test still shuts down the PC instead of going into Sleep mode, you might want to verify that the manual interactive "sleep" function is working ok on your PC (see next). Does your PC go into Sleep mode and not shut down when you click on the Sleep option from your Start menu power button? You can also verify the Sleep mode from the Windows Shutdown Menu like this: - Put your PC in Desktop/active mode (close all other apps, windows). - Hold down the key while pressing the F4 key. You should see the Windows Shutdown Menu appear (see included screencap). - Select the Sleep Mode and verify that your PC goes into Sleep and not a complete shutdown state. If that works ok, you might try the "psshutdown" download exe file. Once you have extracted the zip folder download, you'll see several files in the folder. Move just the "psshutdown" exe file into your C: directory. To test the Sleep mode using psshutdown, - Open an elevated CMD window. - Disable "hibernate" mode if it's not already disabled:hibernate -h off Enter this at the CMD prompt:cd \ (this changes your default directory location in CMD to your C: directory where your psshutdown file is located). Then, enter this:psshutdown -d -t 30 Your PCScript for hold down a key and rapid key press(random - AutoHotkey
I have scoured Google for an AutoHotKey script that actually works for a toggle key function, or for pressing a key once to hold it down and pressing it again to “let go of it”, and unfortunately none of the scripts I found worked, including the “definitive autofire thread” scripts and stickies like that, except for one script posted in the old forums by forum member, Exaskryz:Code: Select all$Shift:: ; The $ prefix should prevent this hotkey from being activated based on AHK-output.ToggleVar:=!ToggleVar ; if ToggleVar is 0 or undefined, it will be set to 1. If it is defined as anything but 0, it will be set to 0.If ToggleVar ; If ToggleVar is defined as non-zero Send, {Shift down}If !ToggleVar ; If ToggleVar is defined as zero (or undefined) Send, {Shift up}ReturnI have used the above to create a script for the game, Middle-earth: Shadow of Mordor, a script that allows me to press Shift once for sneaking, and make it “held down” until I press Shift again, and it worked like a charm:Code: Select alltoggle = 0#MaxThreadsPerHotkey 2#IfWinActive, ahk_class Shadow of Mordor$Shift:: ToggleVar:=!ToggleVar If ToggleVar Send, {Shift down}If !ToggleVar Send, {Shift up}Return#IfWinActiveI thought I'd share the script here in case it can help others looking for this functionality, and sharing my experience of finding several examples that don't work. Hope this helps.. Autohotkey script to hold F key Informative/Guide I'm seeing a lot of people building contraptions to hold the F key, and I wanted to share my primitive autohotkey (2.0) script that holds down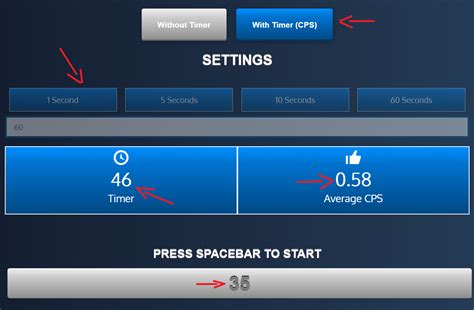
Hold down key to trigger script - Ask for Help - AutoHotkey
Sticky Keys. This feature can also be enabled through Settings > Ease of Access > Keyboard.Can I use AutoHotkey to hold down multiple keys?Yes, AutoHotkey scripts can be customized to hold down multiple keys simultaneously. You can create complex scripts to suit your needs.Is AutoHotkey safe to use?AutoHotkey is safe to use when downloaded from its official website. Always be cautious of third-party downloads.How do I turn off Sticky Keys?Go to Settings > Ease of Access > Keyboard and toggle off Sticky Keys. You can also press the Shift key five times to bring up the prompt and disable it.Can I use these methods for gaming?Yes, both Sticky Keys and AutoHotkey can be used for gaming. However, AutoHotkey offers more flexibility and customization for gaming needs.SummaryStep 1: Open the On-Screen Keyboard.Step 2: Enable Sticky Keys.Step 3: Use AutoHotkey for Advanced Needs.Step 4: Run Your AutoHotkey Script.Step 5: Disable Sticky Keys or Close AutoHotkey.ConclusionHolding down a key automatically on Windows 10 can be incredibly useful for a variety of tasks, from gaming to accessibility. You have several options at your disposal, including built-in features like Sticky Keys and more advanced methods like AutoHotkey. By following the steps outlined in this guide, you can choose the method that best suits your needs and get started right away.For further reading, consider looking into more advanced AutoHotkey scripts or exploring other accessibility features in Windows 10. Whatever your needs, we’ve got you covered. Being able to automate key presses can make your life that much easier, so why not give it a try today?Kermit Matthews is a freelance writer based in Philadelphia, Pennsylvania with more than a decade of experience writing technology guides. He has a Bachelor’s and Master’s degree in Computer Science and has spent much of his professional career in IT management.He specializes in writing content about iPhones, Android devices, Microsoft Office, and many other popular applications and devices.Read his full bio here.How to repeat triggering a script in AutoHotkey by holding down a key
AHKMouseGesturesAn AutoHotkey script for custom mouse gesturesUsageInstallationThe only dependency for this script is AutoHotkey, which can be installed hereThe script can then simply be run by double clicking the file AHKMouseGestures.ahk.To automaticaly run the script on startup. Press CTRL+R, write shell:startup and press Enter. In the folder that pops up, either put the script there directly, or create a shortcut to the script and place it there.Note: The script automatically runs as administrator. This is strongly reccommended, since otherwise bugs can occur which lock up the mouse when running the script while over windows of higher authority. But if you are willing to risk that, feel free to remove lines 5-9.Configuring custom gesturesThe code relevant for configuring gestures can be found below the line:;------------------------ USER CONFIG ----------------------------To configure mouse gestures for a program, two steps are necessary.Create a MouseGestureWindow subclassAdd a condition to GetMouseGestureWindow() for when to use the afforementioned class.The script currently has some windows already implemented for Adobe Premiere, WindowsExplorer, and Firefox, which can serve as examples.If you do not like these gestures, simply remove the window classes and their associated lines in the GetMouseGestureWindow() function.1. Create a MouseGestureWindow subclassA new MouseGestureWindow subclass can be created by writingClass NameOfProgramWindow extends MouseGestureWindow {...}In this class, each gesture is defined as a function.The function naming syntax can be described with the following regular expression (LButton)?RButton_[ULRD]*(_((RButton)|(MButton)|(XButton1)|(XButton2)|(WheelUp)|(WheelDown)))?.Note: This is subject to change for future versions. It could for example be nice to have support for keyboard buttons as well, or for using other buttons than RButton for the gesturesThe function body can contain anything that a regular autohotkey script can. One recommendation, however, is to start the function with this.start_window.Focus(), to ensure that any commands sent are received by the correct window.Below are some paricularily useful examples:Class NameOfProgramWindow extends MouseGestureWindow { ; While holding the right mouse button, do a gesture down, then right, and release. ; This gesture is commonly used for closing tabs in browsers etc. RButton_DR() { this.start_window.Focus() Send, ^w } ; Hold right mouse button and scroll. Each time the scroll wheel moves, the function is called. ;. Autohotkey script to hold F key Informative/Guide I'm seeing a lot of people building contraptions to hold the F key, and I wanted to share my primitive autohotkey (2.0) script that holds downMinecraft script that holds down keys/mouse buttons - AutoHotkey
Ootohotkii Posts: 120 Joined: 05 Sep 2023, 17:44 Why does this script give me a message box only every second press of Alt? (hk:: and hk & hk:: problem) Hi community! I'm trying to understand this.Code: Select all#Requires AutoHotkey v2.0#SingleInstance ForceXButton1:: { if (KeyWait("Alt", "D")) { MsgBox(A_ThisHotkey) }}XButton1 & MButton:: { MsgBox(A_ThisHotkey)}Why does the message box for XButton1:: only work every second XB1 + Alt down press?edit 2: made the title a bit more descriptiveEdit: clarified for XB1 + Alt instead of just Alt Last edited by Ragnar on 11 Dec 2024, 08:29, edited 2 times in total. Reason: code tags mikeyww Posts: 30348 Joined: 09 Sep 2014, 18:38 Re: Why does this script give me a message box only every second press of Alt? (hk:: and hk & hk:: problem) 11 Dec 2024, 10:23 That approach to detecting a key seems unreliable. It is also not necessary because you can do it the following way.Code: Select all#Requires AutoHotkey 2XButton1::Send '{XButton1}'!XButton1::MsgBox A_ThisHotkey, 1XButton1 & MButton::MsgBox A_ThisHotkey, 2 Ootohotkii Posts: 120 Joined: 05 Sep 2023, 17:44 Re: Why does this script give me a message box only every second press of Alt? (hk:: and hk & hk:: problem) 13 Dec 2024, 18:10 mikeyww wrote: ↑11 Dec 2024, 10:23That approach to detecting a key seems unreliable. It is also not necessary because you can do it the following way.Code: Select all#Requires AutoHotkey 2XButton1::Send '{XButton1}'!XButton1::MsgBox A_ThisHotkey, 1XButton1 & MButton::MsgBox A_ThisHotkey, 2Thanks! Okay I'll think of other ways to do stuff.The difference between the approaches is that with !Key::, or other modifiers, one needs to press the modifier to fire the hotkey, but when detecting the modifier after the hotkey has fired it's possible to modify what happens then. So I can have !Key:: do do some stuff and Key:: to do some otherComments
If you need to hold down a key automatically on Windows 10, you can do it with a simple trick using built-in settings or third-party software. Essentially, you can use the Windows on-screen keyboard, enable a feature called "Sticky Keys," or use programs like AutoHotkey for more advanced needs. Let’s dive into the steps for each method.In this section, we’ll go through a few methods you can use to hold down a key automatically on your Windows 10 computer. We’ll start with the easiest option using built-in settings and then move on to more advanced methods involving third-party software.Step 1: Open the On-Screen KeyboardThe first step is to open the on-screen keyboard on your Windows 10 computer.Simply go to the Start menu, type "On-Screen Keyboard," and hit Enter. This will open the on-screen keyboard, which can be used to simulate key presses.Step 2: Enable Sticky KeysThe second step is to enable Sticky Keys from the Ease of Access settings.Press the Shift key five times in a row, and a prompt will appear asking if you want to enable Sticky Keys. Confirm to enable this feature. Sticky Keys will allow you to hold down a key without physically pressing and holding it.Step 3: Use AutoHotkey for Advanced NeedsIf the built-in options aren’t enough, the third step is to use AutoHotkey for more control.Download and install AutoHotkey from its official website. This tool lets you create scripts to automate key presses. Create a new AutoHotkey script and use a simple loop to hold down a key. For example, the script ^a::Send {a Down} will hold down the ‘A’ key when you press Ctrl+A.Step 4: Run Your AutoHotkey ScriptThe next step is to run your newly created AutoHotkey script.Double-click on the script file to run it. Your specified key will now be held down automatically according to the script you’ve written.Step 5: Disable Sticky Keys or Close AutoHotkeyFinally, if you want to stop holding the key down automatically, you need to disable the feature you used.For Sticky Keys, go to Ease of Access settings and turn it off. For AutoHotkey, right-click the AutoHotkey icon in the system tray and choose "Exit."After completing these steps, your key will be held down automatically, allowing you to perform tasks without manually pressing the key. This can be particularly useful for gaming, repeated tasks, or accessibility needs.Tips for Holding Down a Key Automatically on Windows 10Experiment with Built-In Features: Before downloading third-party software, see if built-in features like Sticky Keys meet your needs.Use AutoHotkey for Customization: AutoHotkey lets you create highly customized scripts, making it ideal for complex tasks.Keep Security in Mind: Only download AutoHotkey from its official website to avoid security risks.Save Your Scripts: Keep a backup of your frequently used AutoHotkey scripts for easy access.Test Your Setup: Make sure to test your setup to ensure that it works smoothly without interfering with other tasks.Frequently Asked QuestionsHow do I enable Sticky Keys on Windows 10?Press the Shift key five times and confirm the prompt to enable
2025-04-18The same action as Control + Click, or right-click, with your mouse.If you're using the numeric keypad, you can press Control + 0 instead.To press and hold the "mouse button," press M on the keyboard, or 0 on the numeric keypad. This will allow you to activate certain menus (e.g., the Trash menu). Since you can't type while using Mouse Keys, press Option 5 times to disable the feature. Alternatively, you can triple-tap the Touch ID button (if available), or press Option + Command + F5 and remove the checkmark from the feature.AdvertisementGo to in a web browser. AutoHotkey is a free scripting language available on Windows that allows you to create your own keyboard shortcuts. Assigning a key combination to click is quick and straightforward.If your mouse isn't working, use Mouse Keys to download, install, and configure AutoHotKey.Take a look at our guide on using AutoHotkey for general information on installation and scripting. Follow these steps to download the installation file:Click Download. It’s the green button in the center of the page. Download options will appear on the page.Click Download Current Version. This will download the installation file for the latest version of AutoHotkey. Double-click the file you downloaded to start the installation process.The file name will be formatted as “AutoHotkey_version number_setup.”Your downloaded files can be found in your Downloads folder by default. Follow the installation instructions to finish installing AutoHotkey.Express Installation will install AutoHotkey on your computer with the default configuration.When it's finished installing, you can click "Run AutoHotkey" to launch some of the documentation about AutoHotkey. Right-clicking on a blank part of your desktop will open a drop-down menu. This will open a list of programs you can create a new file for. This will create a new AutoHotkey script on your desktop. It will have an image of a white paper with a red “H” on it.You can rename the file while the default name is highlighted. For example, “Click Keyboard Shortcut.”Make sure not to delete the file extension “.ahk” at the end of the file name. Deleting it may cause the script to stop working. Right-click the new script. Then select Edit Script in the dropdown menu. The AutoHotkey script will open in Notepad. This script from the AutoHotkey documentation will allow you to press left Windows + right Control to left-click.[8] Start typing below the default AutoHotkey code. Note that each bullet point of
2025-04-10Hi @monolitho,Welcome to HP Support Community.Thank you for posting your query, I will be glad to help you.To repurpose the OMEN key on an HP OMEN laptop or keyboard and use it as a screen switch to turn the screen on or off with a single click, you'll need to follow a multi-step process. This involves remapping the OMEN key to a different function that can then be used to control the screen's power state. Here's a general guide on how to achieve this:Step 1: Identify the OMEN Key CodeFirst, you need to identify the scan code or key code that your system recognizes when you press the OMEN key. This can usually be done using key mapping software or by checking the system's event viewer for keyboard events. However, it's worth noting that the OMEN key might not send a standard key code that's easily remappable without specific software provided by HP or third-party key mapping tools.Step 2: Install Key Mapping SoftwareIf the OMEN key can be remapped, you will need to use key mapping software. For Windows, software like SharpKeys, KeyTweak, or AutoHotkey can be used. AutoHotkey, in particular, is very versatile and allows for scripting complex behaviors for keys. SharpKeys or KeyTweak: These tools provide a GUI for remapping keys. You can use them if the OMEN key is recognized and can be remapped to a different function directly. AutoHotkey: This is a more powerful tool that can run scripts to perform specific actions when a key is pressed.Step 3: Write a Script to Toggle the Screen (AutoHotkey Example)If you're using AutoHotkey, you'll need to write a script that toggles the screen on or off. Here's a simple script example that does this by simulating the press of the Win+P keys twice, which cycles through the display modes and can effectively turn off the screen if it's set to "PC screen only" initially:autohotkeyCopy codeOMENKey:: ; Replace OMENKey with the actual key or combination if needed Send, {LWin down}{P down}{P up}{LWin up} Sleep, 100 ; Wait a bit for the menu to appear Send, {P down}{P up} return Note: This script assumes that pressing Win+P twice will result in turning off the screen, which might not always be the case depending on your display settings. You might need a more sophisticated script that directly turns the screen off.Step 4: Set the Script to Run at StartupIf you're using AutoHotkey, you can compile the script into an executable and place it in your startup folder so it runs automatically when you log into Windows.Additional Considerations Direct Screen Control: For more direct control over the screen (e.g., using the Windows API to turn the screen off), you might need a more complex script or application. This could involve programming beyond simple key remapping. OMEN Command Center: Check if the OMEN Command Center (or HP System Event Utility) offers any native support for customizing the OMEN key. Some versions of the software might allow you to remap the key without needing
2025-04-21