Picture in picture settings
Author: g | 2025-04-25
Enable the Picture in Picture feature. Select the Video you want to watch while in picture in picture mode. Setting Up Picture in Picture on YouTube. To set up picture in picture on YouTube, follow these steps: Step 1: Enable Picture in Picture. Go to Settings Display Picture in Picture. Enable the Picture in Picture feature.
Set Of Pictures PNG Picture, A Set Of Pictures Of Different Eyelashes
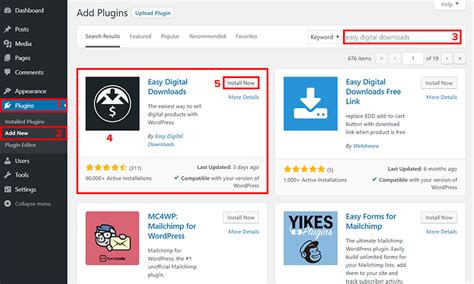
Selected Picture Style. It allows you to customise each style. Only the style Personal can save its settings for each source in the Sources menu.PAGE 46but it is subject to the availability of such HDR format in content providers. Advanced Picture Settings Picture Clean Perfect Natural Reality Noise reduction Settings > Picture > Advanced > Contrast > Perfect Natural Reality. Settings > Picture > Advanced > Picture clean > Noise reduction. Perfect Natural Reality improves the contrast and brightness impression to create HDR effect for standard sources. Not available when video content is supported HDR (High-Dynamic Range).PAGE 47Press the arrows (up) or (down) to set a nonlinear setting for picture luminance and contrast. picture on-screen. Note: Only available when Motion styles set to Personal. Light Sensor Fast Motion Clarity Settings > Picture > Advanced > Contrast > Light sensor. Settings > Picture > Advanced > Motion > Fast Motion Clarity. Select On to adjust the picture settings automatically to the lighting conditions of the room. Set Off, Minimum, Medium or Maximum for the Fast Motion Clarity.PAGE 483 - Or select Undo to return to the setting the picture had when you opened Picture Format. • Shift – Select on the arrows to shift the picture. You can only shift the picture when it is zoomed in. • Zoom – Select on the arrows to zoom in. • Stretch – Select on the arrows to stretch the picture vertically or horizontally. • Undo – Select to return to the picture format you started with. • Personal mode - Access to a more in depth sound settings.PAGE 49DTS Play-Fi Mimi Sound Personalization settings DTS Play-Fi Mimi Sound Personalization settings Settings > Sound > DTS Play-Fi. Settings > Sound > Mimi Sound Personalization settings. With DTS Play-Fi on your Philips TV, you can connect to compatible speakers to stream audio wirelessly to other rooms in your house. Mimi Sound Personalization Mimi Sound Personalization is a technology that adapts the audio signal of the TV in real time to the user’s hearing ability.PAGE 50to Settings > Sound > Room calibration and select Apply calibration to tune the audio output from TV speakers. Set eARC mode to Automatic or Off. Digital Output Settings Advanced Sound Settings Digital output settings are available for optical and HDMI ARC sound signals. Volume Control Digital out format Auto volume Settings > Sound > Advanced > Digital out format. Settings > Sound > Advanced > Auto volume.PAGE 51necessary for the Home Theatre System to process the sound of the TV picture. You can set the value in steps of 5ms. Maximum setting is 60ms. Settings > Ambilight > Enable the Picture in Picture feature. Select the Video you want to watch while in picture in picture mode. Setting Up Picture in Picture on YouTube. To set up picture in picture on YouTube, follow these steps: Step 1: Enable Picture in Picture. Go to Settings Display Picture in Picture. Enable the Picture in Picture feature. Tap Settings. Switch on Picture in Picture. Turn off picture-in-picture. To turn off picture-in-picture: Tap your profile picture . Tap Settings. Switch off Picture in Picture. Dismiss picture-in-picture. How to Turn Smart Picture Mode On LG TV?Are you a proud owner of an LG Smart TV, but struggling to find the perfect picture setting? Look no further! In this article, we’ll guide you through the simple steps to turn Smart Picture Mode on your LG TV, enhance your viewing experience, and enjoy stunning visuals.What is Smart Picture Mode?Smart Picture Mode is a feature on LG Smart TVs that uses advanced AI technology to analyze the content you’re watching and adjust the picture settings accordingly. This mode analyzes the scene, adjusts contrast, brightness, and color, and even optimizes the picture for the perfect viewing experience.Why Use Smart Picture Mode?Using Smart Picture Mode has several benefits:• Improved Picture Quality: Smart Picture Mode analyzes the content and adjusts the picture settings to provide a more lifelike and immersive experience.• Enhanced Color Accuracy: The AI technology in Smart Picture Mode ensures that colors are displayed accurately and consistently, whether you’re watching a sunrise or a sunset.• Reduced Eye Fatigue: Smart Picture Mode adjusts the brightness and contrast to reduce eye strain, making it perfect for binge-watching your favorite shows.• Customized Viewing Experience: Smart Picture Mode can be adjusted to suit your personal preferences and viewing habits.Enabling Smart Picture Mode is a straightforward process. Here’s a step-by-step guide:Method 1: Using the Settings MenuPress the Settings button on your LG TV remote control.Navigate to Picture > Picture Mode.Select Smart Picture from the list of available modes.Adjust the settings as needed to fine-tune your picture quality.Method 2: Using the Magic RemotePress the Magic Button on your LG Magic Remote.Use the Navigation to select Picture > Picture Mode.Choose Smart Picture from the available options.Customize the settings as needed for your preferred picture quality.Method 3: Using the LG TV Home ScreenNavigate to the LG TV Home Screen.Press the Input button on your TV remote control.Select Picture.Choose Smart Picture from the menu.Adjust the settings as needed for the perfect picture quality.Smart Picture Mode Settings:Here are some settings you can adjust to optimize your Smart Picture Mode experience:SettingOptionDescriptionColorVibrant ColorEnhances the color palette for a more vibrant and lifelike experience.ContrastHigh ContrastImproves the contrast ratio for a more detailed and engaging picture.BrightnessEco ModeLowers the brightness to conserve energy and reduce eye fatigue.Local DimmingOnAdjusts the brightness of individual sections of the screen for enhanced contrast and depth.Noise ReductionOnReduces noise and static in the picture for a smoother viewing experience.By following these simple steps, you can turn on Smart Picture Mode and enjoy a more immersive viewing experience on your LG Smart TV. With its advanced AI technology and customizable settings, Smart Picture Mode is the perfect way to optimize your picture quality and create a more engaging viewing experience.Save money with car insurance and credit card tips!Comments
Selected Picture Style. It allows you to customise each style. Only the style Personal can save its settings for each source in the Sources menu.PAGE 46but it is subject to the availability of such HDR format in content providers. Advanced Picture Settings Picture Clean Perfect Natural Reality Noise reduction Settings > Picture > Advanced > Contrast > Perfect Natural Reality. Settings > Picture > Advanced > Picture clean > Noise reduction. Perfect Natural Reality improves the contrast and brightness impression to create HDR effect for standard sources. Not available when video content is supported HDR (High-Dynamic Range).PAGE 47Press the arrows (up) or (down) to set a nonlinear setting for picture luminance and contrast. picture on-screen. Note: Only available when Motion styles set to Personal. Light Sensor Fast Motion Clarity Settings > Picture > Advanced > Contrast > Light sensor. Settings > Picture > Advanced > Motion > Fast Motion Clarity. Select On to adjust the picture settings automatically to the lighting conditions of the room. Set Off, Minimum, Medium or Maximum for the Fast Motion Clarity.PAGE 483 - Or select Undo to return to the setting the picture had when you opened Picture Format. • Shift – Select on the arrows to shift the picture. You can only shift the picture when it is zoomed in. • Zoom – Select on the arrows to zoom in. • Stretch – Select on the arrows to stretch the picture vertically or horizontally. • Undo – Select to return to the picture format you started with. • Personal mode - Access to a more in depth sound settings.PAGE 49DTS Play-Fi Mimi Sound Personalization settings DTS Play-Fi Mimi Sound Personalization settings Settings > Sound > DTS Play-Fi. Settings > Sound > Mimi Sound Personalization settings. With DTS Play-Fi on your Philips TV, you can connect to compatible speakers to stream audio wirelessly to other rooms in your house. Mimi Sound Personalization Mimi Sound Personalization is a technology that adapts the audio signal of the TV in real time to the user’s hearing ability.PAGE 50to Settings > Sound > Room calibration and select Apply calibration to tune the audio output from TV speakers. Set eARC mode to Automatic or Off. Digital Output Settings Advanced Sound Settings Digital output settings are available for optical and HDMI ARC sound signals. Volume Control Digital out format Auto volume Settings > Sound > Advanced > Digital out format. Settings > Sound > Advanced > Auto volume.PAGE 51necessary for the Home Theatre System to process the sound of the TV picture. You can set the value in steps of 5ms. Maximum setting is 60ms. Settings > Ambilight >
2025-03-29How to Turn Smart Picture Mode On LG TV?Are you a proud owner of an LG Smart TV, but struggling to find the perfect picture setting? Look no further! In this article, we’ll guide you through the simple steps to turn Smart Picture Mode on your LG TV, enhance your viewing experience, and enjoy stunning visuals.What is Smart Picture Mode?Smart Picture Mode is a feature on LG Smart TVs that uses advanced AI technology to analyze the content you’re watching and adjust the picture settings accordingly. This mode analyzes the scene, adjusts contrast, brightness, and color, and even optimizes the picture for the perfect viewing experience.Why Use Smart Picture Mode?Using Smart Picture Mode has several benefits:• Improved Picture Quality: Smart Picture Mode analyzes the content and adjusts the picture settings to provide a more lifelike and immersive experience.• Enhanced Color Accuracy: The AI technology in Smart Picture Mode ensures that colors are displayed accurately and consistently, whether you’re watching a sunrise or a sunset.• Reduced Eye Fatigue: Smart Picture Mode adjusts the brightness and contrast to reduce eye strain, making it perfect for binge-watching your favorite shows.• Customized Viewing Experience: Smart Picture Mode can be adjusted to suit your personal preferences and viewing habits.Enabling Smart Picture Mode is a straightforward process. Here’s a step-by-step guide:Method 1: Using the Settings MenuPress the Settings button on your LG TV remote control.Navigate to Picture > Picture Mode.Select Smart Picture from the list of available modes.Adjust the settings as needed to fine-tune your picture quality.Method 2: Using the Magic RemotePress the Magic Button on your LG Magic Remote.Use the Navigation to select Picture > Picture Mode.Choose Smart Picture from the available options.Customize the settings as needed for your preferred picture quality.Method 3: Using the LG TV Home ScreenNavigate to the LG TV Home Screen.Press the Input button on your TV remote control.Select Picture.Choose Smart Picture from the menu.Adjust the settings as needed for the perfect picture quality.Smart Picture Mode Settings:Here are some settings you can adjust to optimize your Smart Picture Mode experience:SettingOptionDescriptionColorVibrant ColorEnhances the color palette for a more vibrant and lifelike experience.ContrastHigh ContrastImproves the contrast ratio for a more detailed and engaging picture.BrightnessEco ModeLowers the brightness to conserve energy and reduce eye fatigue.Local DimmingOnAdjusts the brightness of individual sections of the screen for enhanced contrast and depth.Noise ReductionOnReduces noise and static in the picture for a smoother viewing experience.By following these simple steps, you can turn on Smart Picture Mode and enjoy a more immersive viewing experience on your LG Smart TV. With its advanced AI technology and customizable settings, Smart Picture Mode is the perfect way to optimize your picture quality and create a more engaging viewing experience.Save money with car insurance and credit card tips!
2025-04-14Selecting an option other than [OFF] will disable the built-in red filter effect. Contrast can be reduced by enabling [Y], [O], and [R].Settings can be adjusted in the range [A−2] to [A+2].Highlighting [Set Picture Control] in the i menu and pressing J displays a Picture Control list. Highlight a Picture Control, press 3 to display options, and then edit settings while previewing the effect in the display.Press 1 or 3 to highlight settings. Press 4 or 2 to choose a value in increments of 1, or rotate the sub-command dial to choose a value in increments of 0.25.The options available vary with the Picture Control selected.To abandon any changes and start over from default settings, press the O button.Press J to save changes.Picture Controls that have been modified from default settings are indicated by an asterisk (“U”).Custom Picture ControlsSave modified Picture Controls as custom Picture Controls.OptionDescription[Save/edit]Create a new custom Picture Control based on an existing preset or custom Picture Control, or edit existing custom Picture Controls.[Rename]Rename custom Picture Controls.[Delete]Delete custom Picture Controls.[Load/save]Copy custom Picture Controls to and from a memory card.Creating Custom Picture ControlsHighlight [Manage Picture Control] in the photo shooting or video recording menu and press 2.Select [Save/edit].Highlight [Save/edit] and press 2 to view [Choose Picture Control] options.Select a Picture Control.Highlight an existing Picture Control and press 2 to display edit options.Note that the only Picture Controls available in black-and-white photo mode are [Monochrome], [Flat Monochrome], and [Deep Tone Monochrome].To save a copy of the highlighted Picture Control without further modification, press J. [Save as] options will be displayed; proceed to Step 5.Adjust settings.The options and procedure are the same as for [Set Picture Control].Press J to display [Save as] options when settings are complete.To abandon any changes and start over from default settings, press the O button.Select a
2025-04-08Contact Insignia customer support for troubleshooting assistance.Despite your best efforts, you may encounter some issues when adjusting brightness on your Insignia TV. Here are a few common problems and their solutions:Brightness settings not saving or reverting to default: This issue may occur due to a glitch in the TV’s memory. To resolve it, unplug your TV from the power outlet for 1-2 minutes, then plug it back in and readjust the brightness.Screen too dark or too bright after adjusting settings: If the picture remains excessively dark or bright after adjusting the brightness, try resetting the TV’s picture settings to default. Access the “Picture” menu, scroll to “Reset Picture Settings,” and confirm the reset.Backlight issues causing uneven brightness or dark spots: Uneven brightness or dark spots on the screen may indicate a problem with the TV’s backlight. If the issue persists after adjusting brightness, contact Insignia customer support for further assistance.Resolving picture quality problems that affect brightness perception: Poor picture quality, such as low contrast or color saturation, can impact brightness perception. Adjust contrast, color, and sharpness settings in addition to brightness to achieve the best overall picture quality.Addressing software glitches or firmware issues affecting brightness settings: If you experience persistent problems with brightness settings not working as expected, check for available firmware updates for your Insignia TV. Updating the TV’s software can often resolve glitches and improve overall performance.Tips for Optimizing Insignia TV Brightness and Picture QualityTo get the most out of your Insignia TV’s picture settings, consider these expert tips:Calibrate your TV using a professional calibration disc or online tutorial for the best viewing experience. Proper calibration ensures that your TV displays accurate colors, contrast, and brightness levels.Adjust contrast, backlight, and color settings in addition to brightness to fine-tune your picture quality. Experiment with different combinations to find the
2025-04-04Optimal balance for your viewing preferences.Choose the appropriate picture mode (e.g., Standard, Movie, Game) for your content and viewing environment. Each mode has pre-set brightness, contrast, and color settings optimized for specific scenarios.Reduce glare and reflections in your viewing area by positioning your TV away from windows or using window treatments like curtains or blinds. Minimizing external light sources can greatly improve perceived brightness and picture quality.Maintain an optimal viewing distance and angle relative to your TV screen size. Sitting too close or at an awkward angle can affect your perception of brightness and cause eye strain.Regularly update your Insignia TV’s firmware to ensure you have access to the latest features, performance improvements, and bug fixes. Firmware updates can also introduce new picture settings or enhance existing ones for better customization options.Advanced Brightness Customization OptionsFor users who want even more control over their Insignia TV’s brightness, exploring the advanced picture settings menu can offer additional customization options:Access the advanced picture settings menu by navigating to the “Picture” or “Picture Settings” submenu and looking for an “Advanced Settings” or “Expert Settings” option.Adjust gamma, color temperature, and RGB settings to fine-tune the brightness and overall picture quality. Gamma controls the brightness of mid-tones, while color temperature affects the warmth or coolness of the image. RGB settings allow you to adjust the intensity of red, green, and blue channels individually.Experiment with dynamic contrast and local dimming features (if available on your Insignia TV model) to enhance contrast and brightness in specific areas of the screen. Dynamic contrast automatically adjusts the contrast levels based on the content, while local dimming controls the backlight in different zones for deeper blacks and brighter highlights.Create custom picture profiles for different viewing scenarios, such as movies, sports, or gaming. Save your preferred brightness, contrast, and color settings for
2025-04-07Have you ever had a situation where picture-in-picture stopped working for YouTube? If the answer is yes, this post from MiniTool is what you need. You can get detailed information about YouTube picture in picture and the fixes about YouTube picture in picture not working.On This Page :YouTube Picture in Picture ExplainedYouTube Picture in Picture Not WorkingPicture in Picture YouTube Is Not Available in Your CountryBottom LineIf you are interested in the picture in picture YouTube and you experience YouTube picture in picture not working while using YouTube, you need to read this post. It will explain the YouTube picture in picture in detail and show you how to fix YouTube picture in picture not working.Read Also: Top Fix to YouTube Profile Picture Not Changing.YouTube Picture in Picture ExplainedIn terms of multitasking, desktops have an advantage over mobile phones. But that is changing fast. Smartphones are catching up as desktop alternatives, especially for entertainment and watching YouTube videos.The battle for desktops computing began in a split screen mode on Android phones, and then in Picture-in-picture (PIP). The latter, introduced in the Android 8.0 Oreo, allows you to view other apps while continuing to play videos in a small floating window.YouTube also supports the Picture-in-picture mode. However, the PIP may not work for you. Here the following part will show you how to repair this issue. But before you do that, let’s take a look at the compatibility of the PIP mode.Your phone needs to meet some criteria to enable the YouTube PIP mode. First, your Android device should run Android 8.0 Oreo or above.Second, the PIP mode is currently available only in the United States. The feature was previously limited to YouTube Premium/Red subscription, but was available to all U.S. users in 2018. Only premium YouTube members can use it for videos containing copyrighted music.If you still encounter YouTube picture in picture not working after meeting the above requirements, be sure to update your YouTube application. Then you can try to clear the YouTube app’s cache and check the picture-in-picture settings. Here are the steps for these two methods.Method 1: Clear YouTube App CacheTo clear YouTube app cache, you can follow the instructions below.Step 1: Go to Settings > Apps & notifications/Application Manager/Installed apps. The operational details may vary from device to device. Choose what is available on your phone.Step 2: All apps installed will show up. Then tap YouTube > Storage.Step 3: Tap Clear cache and restart your phone.After that, YouTube picture in picture mode should start working now.Do not tap Clear data/storage, which will cause you to exit the YouTube app and delete all downloaded YouTube videos. Clearing cache removes only temporary files and does not involve any critical data.Method 2: Enable Picture-In-Picture ModeYouTube picture-in-picture settings can be used in two places: device settings and the app. Although PIP is enabled by default, it can sometimes be accidentally disabled. You need to verify that it is enabled. You can follow the instructions below to do that.Device SettingsStep 1:
2025-03-28